|
"Merry Christmas_2023"
MATERIAL AQUI
Preset Illumination\ Lights_ palco ( Guardar em sua pasta de Presets
My PSP Files).
Tube Principal :Blue Christmas Tubes 1 (3) de Adrienne's Designs
Tube Decorativo : Blue Christmas Element (63 \87\88\102\111
Tube Decorativo: space_hole_by_paulinemoss-d71vqf6\
Renee_TUBES-Fetes-2022-8.pspimage
Back: Blue Christmas Paper (8)
Título:Renee_TUBES-Fetes-2022-6
(Agradeço)
Marca D'água .
Efeitos do PSP.
PLUGINS
Plugin VM Natural _Weave Distortion \Speed.
Graphics Plus Cross Shadow _ Quick Tile I
Convolution Filter
MuRa's Meister \ Perspective Tiling.
 \@Night Shadow
Plugin \ AAA Filters \ Custom \ Landscape
Tutorial
Configurar
Escolher duas cores para trabalhar
Foreground #233859 _ Background #d4eefa
1-Abrir o material no PSP, duplique e feche o original.
2-Abrir nova imagem transparente de 1000 x 700 pxls.
3-Selections \ Select All.
Edit Copy no Fundo Blue Christmas Paper (8)\
Edit \ Paste Into Selection.Selections \ Select None.
Adjust \ Sharpness \ Sharpen.
( caso use outro fundo, mesmo procedimento)
4-Layers \ New Raster Layer.
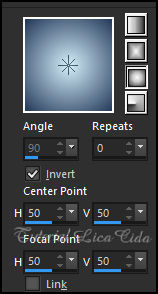
Pintar com o gradiente Sunburst, Repeats 0, Invert marcado.
formado pelas cores em uso. CP=50_50, FP=50_50
5-Selections \ Select All.
Edit Copy no tube principal ( Blue Christmas Tubes 1(3) )\
Edit \ Paste Into Selection.Selections \ Select None.
Effects \ Image Effects \ Seamless Tiling: Default_ Transition% :100
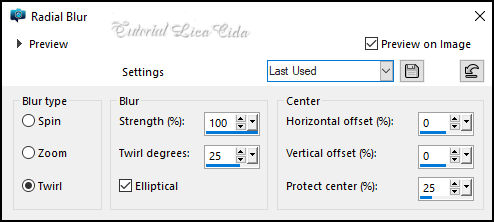
6-Adjust \ Blur \ Radial Blur
7- Plugin VM Natural _Weave
Distortion...

Effects \ Reflection Effects \
Rotating Mirror_ Default.
8-Filters Unlimited 2.0 \ VM Natural \ Speed _Default.(104\85\28\0 )
9- Plugin Graphics Plus Cross Shadow _ Quick Tile I , Default.
(128\128\128)
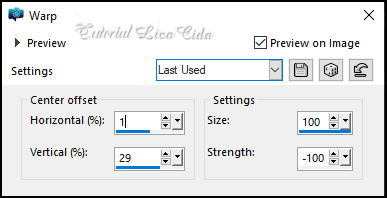
10-Effects\ Distortion Effects\ Warp.
11-Convolution Filter ( Emboss
(light)
Emboss 191.
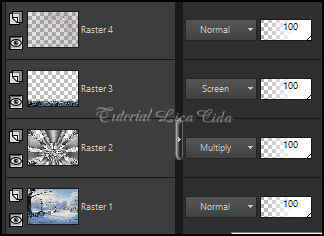
Layers \ Properties_ Blend Mode Multiply
12-Edit \ Copy Special \ Copy Merged.
Edit \ Paste as New Layer.
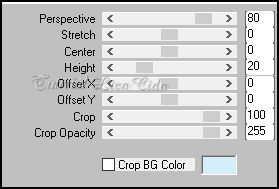
13- Plugin \ MuRa's Meister \ Perspective Tiling.
_Com a ferramenta Magic Wand_
Tolerance 0, Feather 60.
Clique na parte de cima transparente deste efeito para selecionar.
Pressionar a tecla Delete do teclado + ou - 6 vezes.
Selections \ Select None.
Effects \ Reflection Effects \ Rotating Mirror_ 0\0
Emboss3.
Layers \ Properties_ Blend Mode Screen.
14-Edit Copy no space_hole_by_paulinemoss-d71vqf6\Paste a New Layer.
( posicionado) Opcional fechar a layer.
Layers\ Blends
15- Edit \ Copy no Tube Principal,Bl
ue Christmas Tubes 1(3)
Edit \ Paste a new Layer.
Resize 70% \
Posicione\ Drop Shadow a gosto. \
Posicione\ Drop Shadow a gosto.
16-Edit \ Copy no Blue Christmas Element (63)\Edit \ Paste a new
Layer.
Resize60% \Layers\
Arrange\ Move Down. \Layers\
Arrange\ Move Down.
Posicione\ Drop Shadow a gosto.
17-Edit \ Copy no Blue Christmas Element (111)
Resize 70% \ Posicione\ Drop Shadow a gosto.
18-Edit \ Copy noBlue Christmas Element (87)\Edit \ Paste a new
Layer.
Resize 70%
\ Posicione\ Drop Shadow a gosto.
19-Edit \ Copy no Blue Christmas Element (88)\ Edit \ Paste a new
Layer.
Resize 70% \Layers\
Arrange\ Move Down.
Posicione\ Drop Shadow a gosto.
As layers estarão assim.
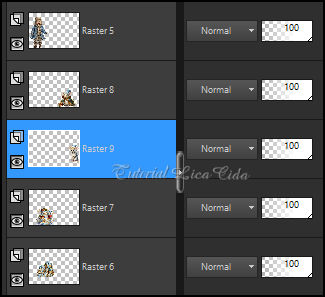
20-Layer do topo( raster5) .
Edit \ Copy no Blue Christmas Element (102))
Objects Align Top. Drop Shadow a gosto.
21-Layers duplicate
Adjust \ Blur \ Gaussian Blur . R: 10,00.
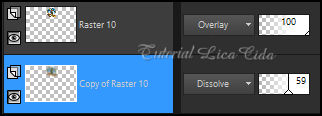
Layers \ Properties_ Blend Mode Dissolve_Opacity + ou - 59%
22-Layer inferior ( raster10): Layers\Arrange\Bring to Top
Layers \ Properties_ Blend Mode Overley
23-Edit \ Copy noRenee_TUBES-Fetes-2022-8.pspimage(
estrelas_usei as selecionas) \ Edit \ Paste a new Layer.
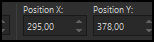
24-Com a Ferramenta Pick Tool, posicionar: Position X: 295 Position
Y: 378
*Layers duplicate _ Objects Align
Top.
*Layers duplicate_
Effects \ Image Effects \ Seamless Tiling: Default_ Transition% :100
Layers\ Merge\ Merge Down.( aplicar duas vezes)
Drop Shadow a gosto.
25-Layer raster1.
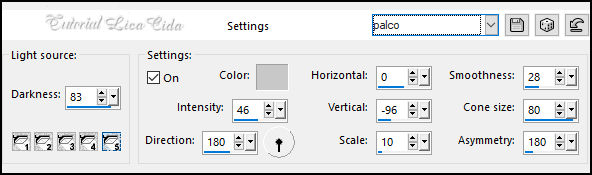
Effects\ Illumination Effects\Preset Illumination\Lights\palco
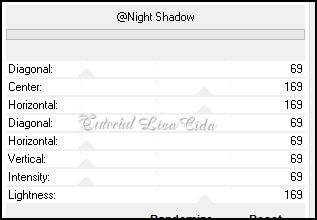
26-Filters Unlimited 2.0 \ _@Night Shadow_Default.
Layers Duplicate.
Layers \ Properties_ Blend Mode Overley
Borders
Image \ Add Borders \1px color: escura
Image \ Add Borders \1px color: clara
Image \ Add Borders \1px color: escura
Image \ Add Borders \30 pxls - color: Branco #FFFFFF
Image \ Add Borders \2pxls color: escura
Image \ Add Borders \50 pxls - color: Branco #FFFFFF
Image \ Add Borders \2pxls color: escura
27- Plugin \ AAA Filters \ Custom \ Landscape , Default.
28-Edit \ Copy no Renee_TUBES-Fetes-2022-6)\ Edit \ Paste a new
Layer. ( aqui o azul )
Posicione a gosto.
Resize _Width 1024 pxls.
Aplicar a marca d'água.
Assine e salve.
File \ Export \ JPEG Optimizer.
:::...VOLTAR...:::
|
