|
"Loiva"
MATERIAL AQUI
Seleção: alpha_channel_loiva
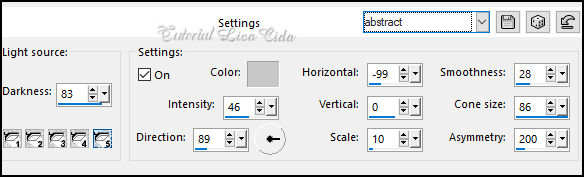
Preset Illumination\ Lights_lights \ abstract. ( Guardar em sua
pasta de Presets My PSP Files).
Tubes: Callitubes-3526mulheres\mentali-misted2954\Callitubes-789flores
decorwave-brancobylc
titulobylc\
(Agradeço)
Marca D'água .
Efeitos do PSP.
PLUGINS
Plugin MuRa's Seamless\Stripe of Cylinder...
Plugin MuRa's Seamless\Shift at Random...
Plugin VM Distortion \ Kaleidoscope.
Plugin \ AAA Filters
Effects \ Plugin \ AAA Frames \Foto Frame
Tutorial
1-Abrir o material no PSP, duplique e feche o original.
Escolher duas cores para trabalhar.
Foreground #2a2b1d
Background \#6b6e4e
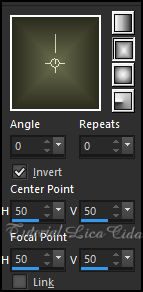
2- Abra a cópia da Alpa_Channel_loiva_by LC
Pintar com o gradiente Rectangular formado pelas cores em uso.
3- Edit \ Copy
no mentali-misted2954. Paste As New Layer.
4-Effects\ Image Effects\ Seamless Tiling: Default.
5-Adjust \ Blur \ Gaussian Blur \R= 28,00.
Layers\Merge\ Merge Down.
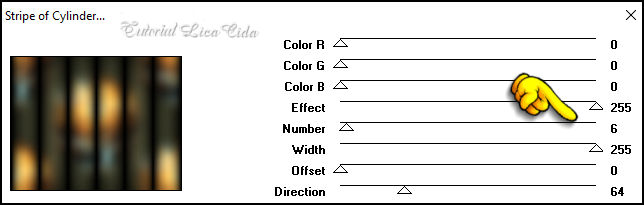
6-Plugin MuRa's Seamless\Stripe of Cylinder...
7-Plugin MuRa's
Seamless\Shift at Random...Default
255\16\0\0
8-Selections \ Load/Save Selections \ Load Selection from Alpha
Channel :#1
Promote Selection to Layer
Selections\ Select none.
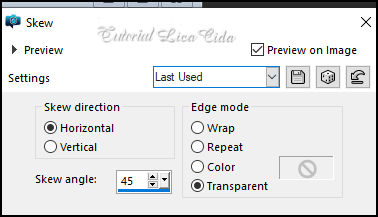
9-Effects\ Geometric Effects\ Skew.
10- Plugin VM
Distortion \ Kaleidoscope.
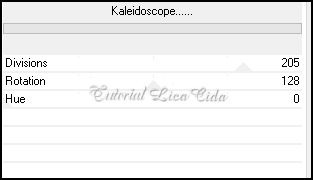
Image Resize 90%
11-Edit \ Copy
no mentali-misted2954. Paste As New Layer.
Adjust \ Sharpness \ Sharpen More.
Image Resize 90%
Layers\ Arrange\
Move Down.
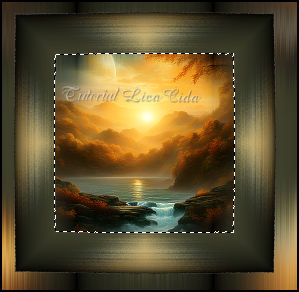
12--Effects \ Plugin \ AAA Filters \ Custom \ Landscape , Default.
13-Ativar a layer do topo(Promoted Selection) \ Selecione o quadrado
com a Ferramenta Magic Wand_Defalult.
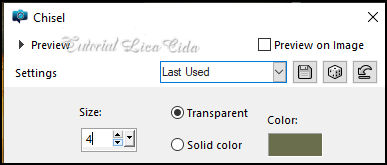
14- Effects \3D
Effects\Chisel . Color=#6b6e4e ( background)
Selections\
Select none. Layers\Merge\ Merge Down.
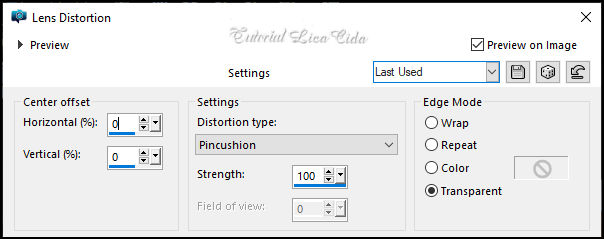
15- Effects\ Distortion Effects\Lens Distortion.
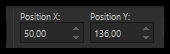
16-Pick Tool:
Position X 50, Position Y 136.
Layers Duplicate
17- Image Resize 80%
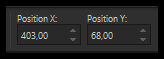
18-Pick Tool:
Position X 403, Position Y 68
*Usar na raster2
e sua cópia:
Effects \ 3D Effects \ Drop Shadow: 0, 0, 80, 40,00, color #000000.
Ativar a raster1.
19-Selections \ Load/Save Selections \ Load Selection from Alpha
Channel :#2
20-Layers \ New Raster Layer
Preencher com a color do Foreground #2a2b1d.
Selections\ Select none.
21-Effects \ Distortion Effects \ Wave:

Opacity 75%
22-Edit \ Copy no decorwave-brancobylc .Edit \ Paste a New Layer.
Layers \ Properties: Blend Mode Soft Light
Layers Duplicate
Layers \Arrange\ Move Down
Layers\ Blends\ Opacitys
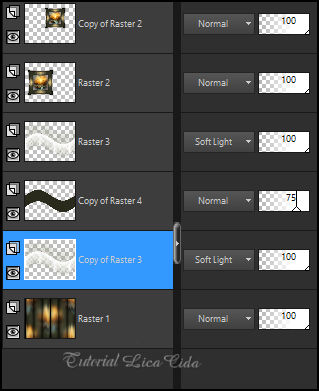
Copy of Raster4:
Effects \ 3D Effects \ Drop Shadow: 0, 0, 80, 40,00, color #000000.
Edit \ Repeat.
Duplicar a raster1.
24-Plugin MuRa's Meister \ Perspective Tiling: Height 20.
*Clica na parte transparente com a ferramenta Magic Wand Tool\
Tolerance 0 _ Feather 80
Aperte a tecla Delete do teclado 6_7 vezes.
Selections\ Select none.
25-Effects \ Reflection Effects \ Rotating Mirror: 0 \ 180.
26-Ainda na raster1. Layers Duplicate.
Na layer duplicada:
Effects\ Illumination Effects\Preset Illumination\Light\abstract.
Layers \ Properties: Blend Mode=Dodg
Layer do topo
27- Edit \ Copy no titulobylc .\Edit \ Paste a New Layer.
Posicione_veja modelo
28-Edit \ Copy no Callitubes-3526mulheres\ Edit \ Paste a New Layer.
Use a gosto.
29-Edit \ Copy no Callitubes-789flores\\Edit \ Paste a New Layer.
Use a gosto
*Estou na layer do topo
30-Edit \ Copy Special Copy Merged.
Selections \ Select All
Image \ Add Borders \ 50 pxls color#ffffff.
Invert
Edit Paste Into Selection
Adjust\ Blur\ Gaussian Blur. 28,00.
Effects \ Plugin \ AAA Frames \Foto Frame. Width 30, demais valores
Default. Edit \Repeat.
Invert
Effects \ 3D Effects \ Drop Shadow: 0, 0, 80, 40,00, color #000000.
Edit \Repeat
Selections \ Select None
Image \ Add Borders \ 1 pxl color #000000.
Resize _Width 1024 pxls.
Aplicar a marca d'água.
Assine e salve.
File \ Export \ JPEG Optimizer.
Aparecida\lica fevereiro de 2024.

:::...VOLTAR...:::
|