|
"Telma"
Tel Viana
Obrigada, com carinho!!
MATERIAL AQUI
Alphachannel_bylicacida
Tubes:KamilTube-857\Callitubes-538paisagens\Callitubes-333flores
Deco-MJ( não use sem autorização)ua\decobylc.
Tituloby lc.
Obrigada!!!.
(Agradeço)
Marca D'água .
Efeitos do PSP.
PLUGINS
VM Extravaganza\Transmission
FMTT\ Saturation Emboss
Plugin Mura's Meister \ Copies
Alien Skin Eye Candy 5 Impact
Plugin \ AAA Frames \Foto Frame
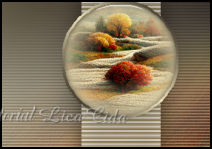
Tutorial
1-Abrir o material no PSP, duplique e feche o original.
Escolher duas cores para trabalhar.
Foreground #0f0803
Background #eee2b8
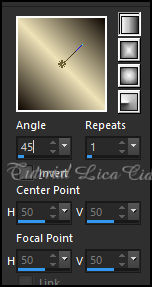
2-Abra o arquivo Alphachannel_bylc, Pintar com gradiente Linear ,Angle
45\Repeats1,
formado pelas cores em uso.
3-Layers \ New Raster Layer.
Select All. Edit Copy no
Callitubes-538paisagens \ Edit Paste Into Selection. Selections\
Select none.
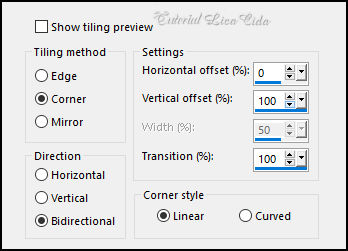
4-Effects\ Image Effects\ Seamless Tiling:
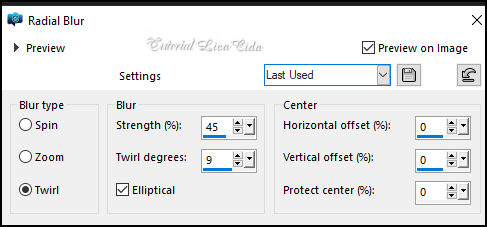
5-Adjust\ Blur\ Radial Blur.
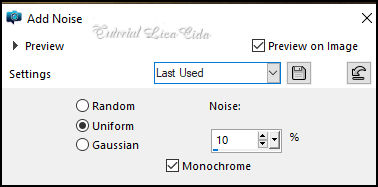
6-Adjust \ Add/Remove \ Add Noise.
7- FMTT\ Saturation Emboss\Default.
8-VM Extravaganza\Transmission...
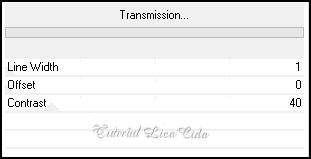
Layers\ Merge \Down
9- Selections \ Load/Save Selection \ Load Selection From Alpha
Channel: Selection #1
10-Layers \ New Raster Layer.
Flood fill \ Opacity 50%\ Preencher com a color do Background
#eee2b8 (pincelar duas vezes)
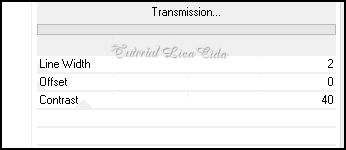
11-VM Extravaganza\Transmission...
( trocar o primeiro valor)
*Effects\ Edge Effects\ Enhance
Selections \ Select None.
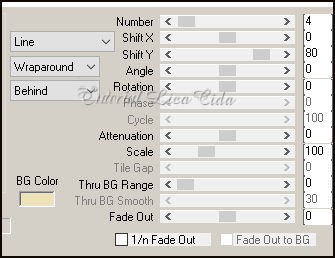
12-Plugin Mura's Meister \ Copies_*Line (rotate)

Effects \ 3D Effects \ Drop Shadow:
0, 0, 80, 40,00, color #000000.
13- Selections \ Load/Save Selection \ Load Selection From Alpha
Channel: Selection #2
14-Layers \ New Raster Layer.
Flood fill \ Opacity 50%\ Preencher com a color do Background
#eee2b8 ( pincelar duas vezes)
15-Edit Copy no
Callitubes-538paisagens \ Edit Paste Into Selection.
Adjust \ Sharpness \ Sharpen
Layers Duplicate ( mantenha a seleção)
*Normalizar flood fill \opacity 100%
16- Plugin \ Alien Skin Eye Candy 5 Impact \ Glass:
Settings: Clear
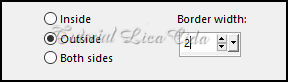
17-Selections \ Modify \ Select Selection Borders:
usar_ color do Background #eee2b8 (100%)
Selections\ Select none.
Drop Shadow a gosto.
Layers\ Merge \Down
18-Ativar a Layer Merged.
Edit \Copy no deco-MJ ,Edit \ Paste a New Layer.
Layers\ Properties\ General \ Blend Mode:Luminance(L)
19-Ativar a Layer Raster1.
Edit \Copy no Callitubes-538paisagens\
Edit \ Paste a New Layer.
Adjust \ Sharpness \ Sharpen . Layers\ Arrange\ Move Up
_Até aqui nosso tutorial
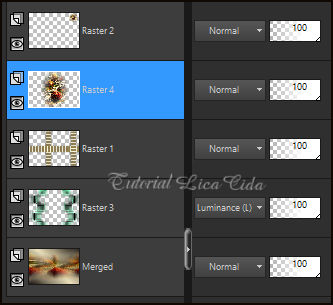
20-Ativar a layer Raster2, a do
topo.
Image Resize 80%

*Voltar ao seu local de origem
21-Plugin Mura's Meister \ Copies_*Line
Drop Shadow a gosto.
22-Edit \Copy no decobylc . Edit \ Paste a New Layer.
_Objects\ Align \Left.
Layers\ Properties\ General \ Blend Mode:Screen.
23-Edit\ Copy Special\ Copy Merged.
24-Borders
Image \ Add Borders \ 1 pxl color #escura
Image \ Add Borders \ 2 pxls color #clara
Image \ Add Borders \ 1 pxl color #escura
Selections \ Select All
Image \ Add Borders \ 50 pxls color#ffffff.
Invert
Edit Paste Into Selection.
Adjust\ Blur\ Gaussian Blur. 8,00.
Plugin Graphics Plus\Cross Shsdow\Default.
Adjust \ Add/Remove \ Add Noise.
( print ítem 6)
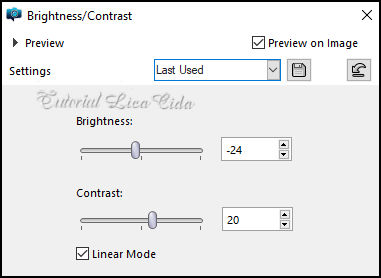
Adjust\ Brightness/Contrast.
Invert \Drop Shadow a gosto.
Selections\ Select none.
25 - Effects \ Plugin \ AAA Frames \Foto Frame. Width 25, Matte1,
Opacipy 80 ,demais valores Default.
Edit Repeat ítem25.
26 - Effects \ Plugin \ AAA Frames \Foto Frame. Width 10, Matte1,
Opacipy 80 ,demais valores Default.
Edit Repeat ítem26.
Image \ Add Borders \ 1 pxl color #000000.
27-Use o Título a gosto!!
Resize _Width 1024 pxls.
Aplicar a marca d'água.
Assine e salve.
File \ Export \ JPEG Optimizer.
Aparecida, Outubro de 2023.

:::...VOLTAR..::: |