|
|
|
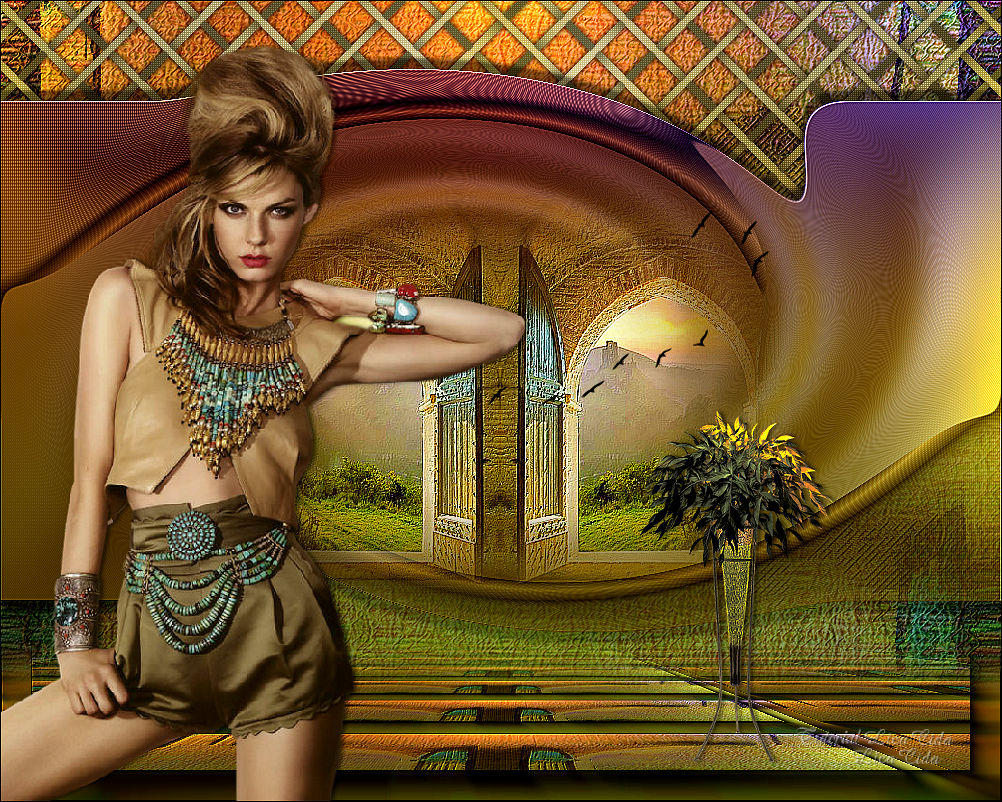
"Woman Golden"
Preset Illumination\Lights_flipper
(marapontes) ( Guardar em sua pasta de Presets My PSP
Files).
Gradiente: Metallic
Gold _Corel_06_022 Tubes:kittys-KT-206 womanGolden-Day\
3441-luzcristina\Grisi_Tube_Decoration_342\Birds of a Feather
II_21.
(Agradeço)
Marca
D'água . Efeitos do PSP.
Versão usada PSPX8.
Plugins
Plugin
penta.com.
Plugin
Flaming Pear
Plugin
MuRa's Meister.
Alien
Skin\Eye Candy 5
Tutorial _Roteiro
1-Abrir uma nova imagem
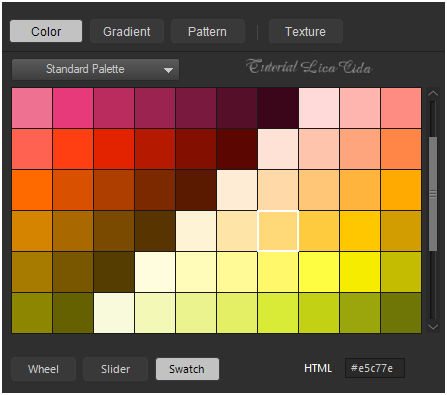
transparente de 1000 x 700 pxls. Preencher com o gradiente
metallic gold...( anexado ou outro metallic a gosto). Configurar Radial ,
Angle 0 \ Repeats 1. Invert desmarcado . CP: H e V= 50.
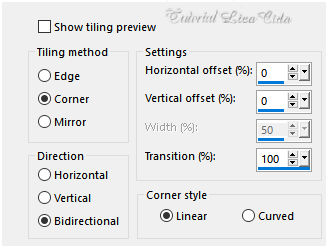
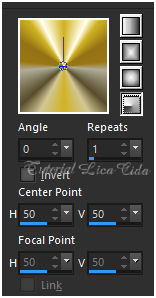 _Effects\ Image Effects\ Seamless
Tiling:
 _Adjust \ Blur\ Gaussian Blur...R:
36,00.
2- Plugin penta.com _color dot _Default
. ( 90\2\255\255\255 ).
Layer
Duplicate.
3-Effects\ Image Effects\ \Page Curl.
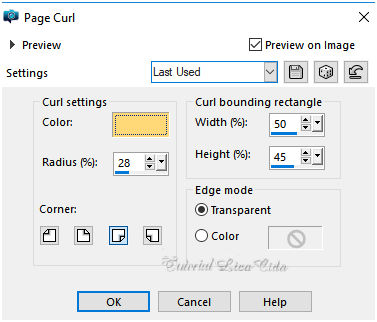 Selecione a cor que combine com o seu
back.
 Layer
Duplicate .
Image Mirror Horizontal\ Image Mirror
Vertical.
Opacity 50%. Layer_ Merge\ Merge
Down.
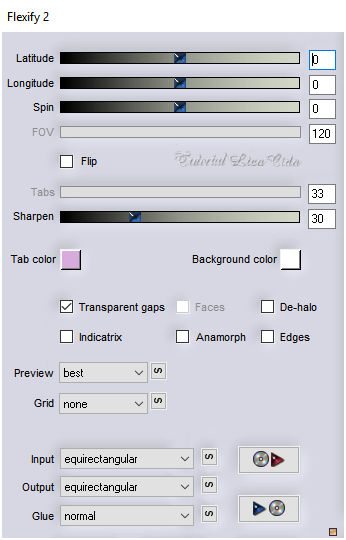
4-Plugin Flaming Pear _Flexify 2.
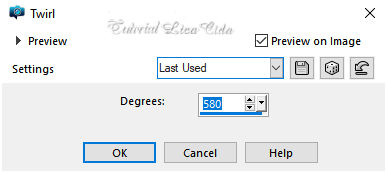
 5-Effects\ Distortion Effects\ Twirl.
6-Plugin
MuRa's Seamless \
Emboss at
Alphha..._Default.
_Effects\3D Effects\ Drop Shadow. ( menos )
-11\ (menos) -3\ 50\ 5,00 . (Color=#000000).
_Effects\3D
Effects\ Drop Shadow. 11\ 3\ 50\ 5,00 .
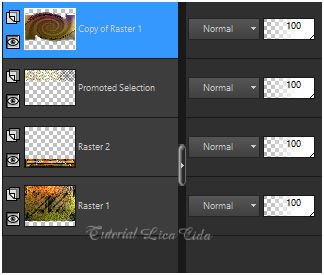
(Color=#000000). 7- Ativar a raster1 .
Seleção Personalizada ( tecleS).
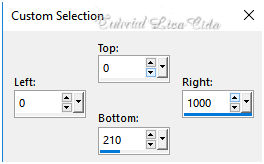 _Promote Selection to Layer . Selections\
Select none.
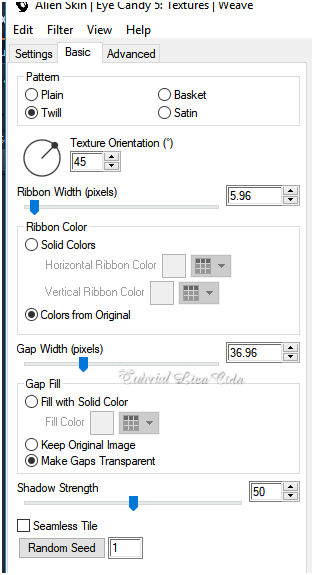
8- Alien Skin\Eye Candy 5: Texture\
Weave.
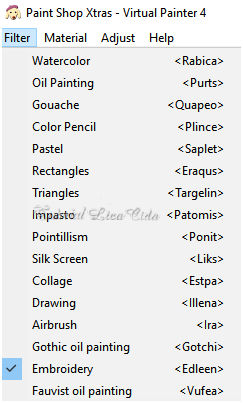
 _Effects\3D Effects\ Drop Shadow 0\ (menos) -3\ 50\ 5,00 . (Color=#000000). _Effects\3D Effects\ Drop Shadow 0\ 3\ 50\ 5,00 . (Color=#000000). 9-Volto a raster1. Select All. Edit Copy no tube misted 3441-luzcristina \ Edit Paste Into Selection . Selections\ Select none. _Effects\ Image Effects\ Seamless Tiling: ( repetir\ veja print acima )10-Plugin Virtual Painter \ Virtual
Painter4...
 11-FMTT\ Blend Emboss.
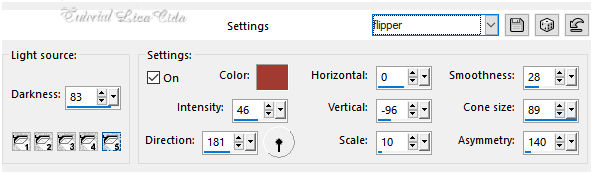
12-Effects\ Illumination Effects\ Preset
Illumination\ Lights\ flipper .
 13-
Image\ Canvas Size.
 Copio
essa layer ( raster1) .Seleciono a parte transparente com a ferramenta
Magic Wand_Default.
Nova layer .Edit Paste Into Selection .
Selections\ Select none.
14- Plugin AAA Frames \ Foto
Frame...Width=30\ demais valores _Default.
15-Plugin MuRa's Meister \Perspective Tiling.
Heigth20\ demais valores _Default.
*Com a Ferramenta Magic Wand \
Feather 60 \ Clique na parte
transparente . Deletar
( tres\quatro vezes_ suavizar o efeito ). Selections \
Select
none.
_Repetir: Plugin AAA Frames \ Foto
Frame...Width=30\ demais valores _Default.
_Repetir:FMTT\ Blend Emboss.
16-Ativar a layer superior, copy of
raster1.
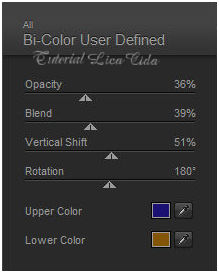
Plugin
Nick Software\ Color EfexPro 3.0\ Bi -Color User
Defined.
 Repetir:Effects\ Illumination Effects\ Preset
Illumination\ Lights\ flipper .
Adjust\ Sharpness\ Sharpen More.
Layers\ Blends\ Opacitys.
 17-Edit Copy no misted 3441-luzcristina \Paste As
New Layer.
Adjust\ Sharpness\ Sharpen More.
18-Edit Copy no Birds of a Feather II_21 \Paste As
New Layer. Use a gosto.
19-Edit Copy no kittys-KT-206 womanGolden-Day
\Paste As New Layer. Mirror. Posicione.
20-Edit Copy no Grisi_Tube_Decoration_342\Paste As New
Layer.
_Image \ Add Borders \ 1 pxl color
=#000000.
**Plugin
AAA Filters\ Custom_Landscape ( Default). (
Opcional) Aplicar a Marca D'agua.
Assine e
salve.
Aparecida \ licacida , fevereiro de
2018.
Espero que gostem.
Obrigada!   |