
|
|
|
"Poeme"
Preset katrina _mp \ do Eye Candy
5/Impact/Glass.
(Dar duplo clic sobre o preset para
importar-lo ao Plugin).
Seleção: poeme_lc.PspSelection. ( Salve em sua pasta de seleções
My PSP Files ). Preset
Illumination\Lights_poeme \ mp ( Guardar em sua pasta de
Presets My PSP Files). Tube:
4852-luzcristina.
Texto:text2-4e9f_71L_ poeme
Brushes:OBG_BRUSH_33.
Deco:Ildiko_create_deco (37)
\ Ildiko_create_deco (24)\Ildiko_Desings_Created@Deco
(3) .
(Agradeço)
Marca
D'água . Efeitos do PSP.
Versão usada PSPX8.
Plugins
FFG\T.
Plugin
Alien Skin Eye Candy 5: Impact
Tutorial _Roteiro
1-Abrir uma nova imagem
transparente de 1000 x 700 pxls. Preencher com
a color
 =#8a6140, retirada do seu
tube . =#8a6140, retirada do seu
tube .2-Plugin Graphics Plus\ Cross
Shadow_Default.
Adjust\ Add/ Remove Noise \ JPEG
Artifactal Removal... ( Maximum\ C=80) .
Plugin FMTT\ Blend
Emboss. 3-Effects\ Artistic Effects\ Halftone.
 4-FFG\T.
 _Layer
Duplicate \ Image Resize 80 %.
5- Selections\ Select All.
Nova layer .
Edit Copy no OBG_BRUSH_33 \ Edit
Paste Into Selection . Selections\ Select none.
_Image\ Negative Image. Opacity
26%. 6-Edit
Copy no text2-4e9f_71L_ poeme\ Paste As New Layer.
_Image\ Negative Image.
Effects\3D Effects\ Drop Shadow. 3\
3\ 85\ 3,00 . (Color=#000000).
7-Edit Copy
no tube 4852-luzcristina\ Paste As New Layer.
Adjust\ Sharpness\
Sharpen . Objects\ Align\ Left.
(Posicione de
acordo com seu tube).
8-Selections \Load \ Save Selection \
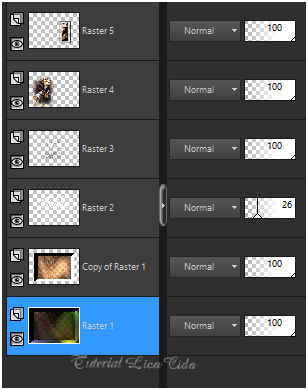
Load Selection From Disk \ Load \poemelc.PspSelection. _Nova Layer. Preencha color=# ffffff.
_Selections\ Modify\ Contract 8 pxls. Delete.
9-Selections\ Modify\ Contract 28 pxls. Preencha seleção color=# ffffff.
Selections\ Modify\ Contract 8 pxls.
Preencha seleção color=#8a6140.
10-Edit Copy no tube 4852-luzcristina\ Paste As New Layer.
Posicione sobre a seleção a gosto.
Invert\ Delete.
Selections\ Select none. Layer\ Merge\ Down.
Effects\3D Effects\ Drop Shadow. 3\
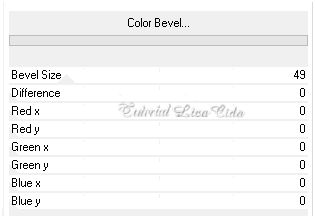
3\ 85\ 3,00 . (Color=#000000). 11-Plugin Alien Skin Eye Candy 5: Impact\
Glass... Setting\ use Setting\ katrina .
12-Ativar a Raster1.
Effects\ Illumination Effects\
Preset Illumination\ Lights\ poeme.
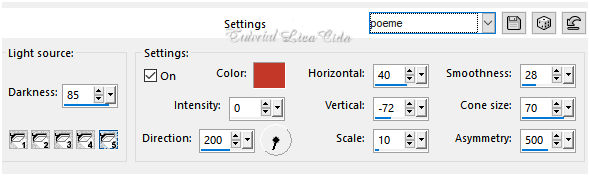 Layers\ Blends\ Opacitys.
 13- Ativar a Raster 5, layer superior.
Edit Copy no Ildiko_create_deco (37)\ Paste As New Layer.
Effects\ Image Effects\ Offset .
H=( menos) -224 \ V= (menos) - 102 . Custom e
Transp.
_Effects\ Image Effects\ Seamless Tiling: Side by side.
Emboss 3.
14-Edit Copy no Ildiko_create_deco (24)\ Paste As New Layer.
Effects\ Image Effects\ Offset .
H=( menos) -295 \ V= 200 . Custom e
Transp.
_Effects\ Image Effects\ Seamless Tiling: Side by side.
( apague o efeito sobre o tube )
Layer Duplicate . Image\ Mirror Vertical.
Layer\ Merge\ Down. Blend Mode=Luminance(L)
15- Duplicar a Raster1 \ Layer\ Arrange\ Bring to Top.
Blend Mode=Overley. Opacity 30%.
*Plugin AAA Filters\ Custom_Landscape \Default ( Opcional ).
16-Selections\ Select All.
Nova
layer .
Edit Copy no Ildiko_Desings_Created@Deco
(3) \ Edit Paste Into Selection . Selections\ Select
none.
BM=Dissolve.
Ultimas_Layers\ Blends\ Opacitys.
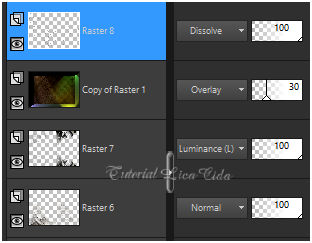 Image \ Add
Borders \ 30 pxls color
=#ffffff. Aplicar a Marca D'agua.
Assine e
salve. Aparecida \ licacida , abril de 2018.
Espero que gostem.
Obrigada! 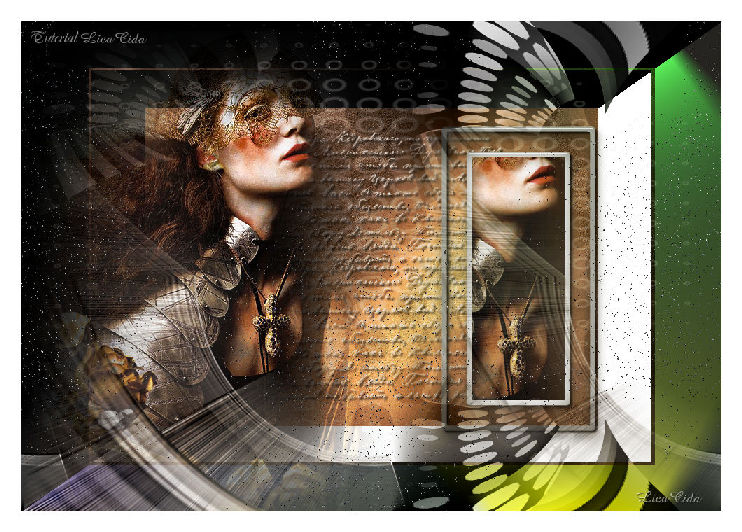  |