|
|
|
"Alive"
Preset
Illumination\Lights_alive (mp) ( Guardar em sua pasta de
Presets My PSP
Files). Tubes:5008-luzcristina
\bouquet_de_fleurs_tubed_by_thafs\CAL-2917-080218.
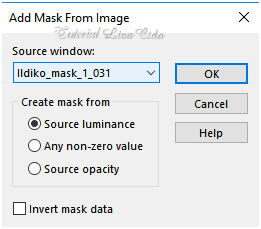
Masks:Ildiko_mask_1_031
\Narah_Mask_1287.
Back:
raster3lc.
Deco:
deco1lc \deco2lc-chão \decoarquivo\decor_nmcriacoes_86.
(Agradeço)
Marca
D'água . Efeitos do PSP.
Versão usada PSPX8.
Plugins
Plugin
Galaxy
Plugin
MuRa's Meister
Plugin
Carolaine and Sensibility
Tutorial _Roteiro
1-Abrir uma nova imagem
transparente de 1024 x 800 pxls. Selections\ Select All .
Edit Copy no CAL-2917-080218 misted ( raster1
) \ Edit Paste Into Selection. Selections\ Select
none.
2-Effects\ Image Effects\ Seamless
Tiling: Default.
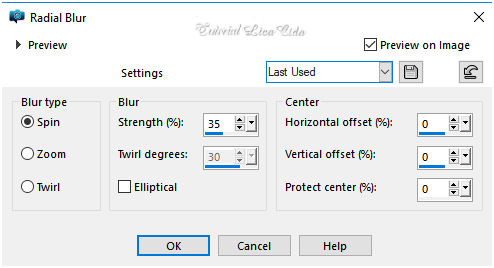
3- Adjust\ Blur\ Radial Blur.
 4-Plugin
Galaxy. 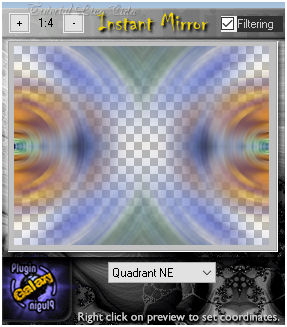
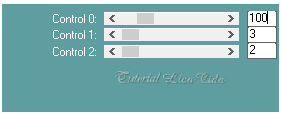
5- Plugin Carolaine and Sensibility\
CS-LDots...
_Escolha duas cores que combinem com seu tube
principal.
Configurar:
Foreground
 #1f0e00 \ Background #1f0e00 \ Background  #b1a585 #b1a585
6-Nova Layer.
Preencher com a color do
foreground #1f0e00.
Nova Layer.
Preencher com a color
do background #b1a585.
7-Aplicar a
Mask_Ildiko_mask_1_031.
 Layer \ Merge
Group.
Plugin \
MuRa's Seamless \ Emboss at Alpha... _Default.
8- Selecionar com a
ferramenta Magic Wand_Default, os retângulos formados.
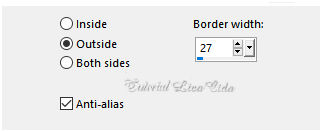
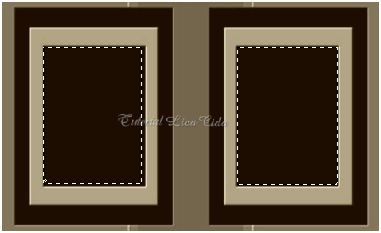 9- Selections \Modify\
Select Selection Borders.
 Promote Selection to Layer.
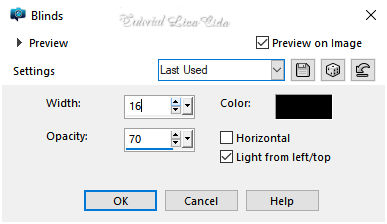
10- Effects\ Texture Effects\
Blinds
Selections\ Select
none.
11- Nessa layer, promoted selection ,selecionar como ítem
8.
_Edit Copy no CAL-2917-080218 misted (
raster2 ) \ Edit Paste Into Selection. Selections\ Select
none.
12- Ativar a Group -Raster3. A layer
inferior.
Layer
Duplicate
_Plugin Galaxy ( mesmo preset
ítem
4).
Layer
Duplicate
13-Plugin MuRa's Meister \Perspective
Tiling . Height 21 \ demais valores
_Default.
Plugin \ MuRa's
Seamless \ Emboss at Alpha...
_Default.
Effects\3D Effects\ Drop Shadow _Default.
14- Ativar a layer superior (Promoted
Selection).
Layer
Duplicate.
_Plugin Galaxy (mesmo preset ítem
4).
Layer\ Merge
Down.
Adjust \One Step Photo Fix (
opcional _ vai depender do seu
misted).
Adjust Sharpeness \ Sharpen More.
Effects\3D Effects\ Drop Shadow _Default.
15- Nova Layer\ Send to
Bottom.
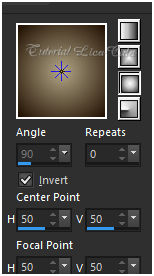
Preencher
com a gradiente formada pelas cores acima. Configurar Sunburst
\ Repeats 0. Invert marcado.
CP e FP\ H e V =50.
 16-Effects\ Illumination
Effects\ Preset Illumination\ Lights\ alive.
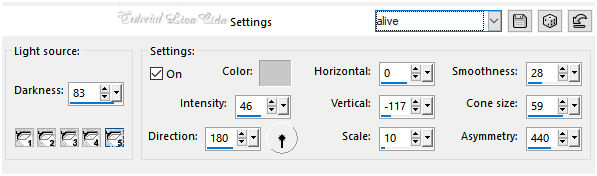 layers\ blends\
opacitys
( use a gosto
)

17- Ativar a
Raster2.
Edit Copy no deco1lc\
Paste As New
Layer.
(
raster4)
18-Edit Copy no
decor_nmcriacoes_86\ Paste As New
Layer.
Effects\3D Effects\ Drop Shadow _Default.
(
raster5)
19-Ativar a Layer Copy (2) of
Group- Raster3 (Perspective Tiling
).
Edit Copy no deco2lc-chão\
Paste As New
Layer.
Objects\ Align\ Bottom.
(
raster6)
20-Nova Layer.
Preencher com a color
do background #b1a585.
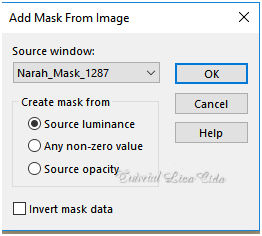
Aplicar a Narah_Mask_1287
 Layer \ Merge
Group.
Plugin \
MuRa's Seamless \ Emboss at Alpha...
_Default.
Layer
Duplicate
Image \ Mirror\
Horizontal.
Layer\ Merge
Down.
21-Effects\ Distortion Effects\Pinch.
S=100%.
Layer
Duplicate
Layer\ Merge
Down.
Plugin \ MuRa's
Seamless \ Emboss at Alpha...
_Default.
Effects\3D Effects\ Drop Shadow 1\ 1\ 100\ 1,00
.Color=#000000.
22-Edit Copy no
decoarquivo\ Paste As New
Layer.
(bm= luminance(L)
)
23-Ativar a layer
superior:
Edit Copy no tube
5008-luzcristina\ Paste As New Layer.
Posicione.
24-Edit Copy no tube
bouquet_de_fleurs_tubed_by_thafs\ Paste As New Layer. Resize a
gosto.
Posicione.
25-Edit Copy na
raster3.
( segue
anexado)
Image \ Add
Borders \ 2 pxls color
=#background.
Image \
Add Borders \ 20 pxls color
=#ffffff.
Selecione.
Promote Selection to
Layer.
Edit Paste Into Selection.
Selections\ Select none
.
( a raster3 copiada)* segue
anexo.
Image \ Add
Borders \ 1 pxl color
=#background.
Image \ Add
Borders \ 30 pxls color
=#ffffff
Selecione.
Promote Selection to
Layer.
Edit Paste Into Selection.
( a raster3
copiada).
*Plugin Carolaine and Sensibility\
CS-LDots... ( veja print ítem 5
).
Invert
Effects\3D Effects\ Drop Shadow 0\ 0\
80\ 40,00.Color=#000000.
Selections\ Select none
.
Merge
All.
Resize \ Width 1024pxls
Aplicar a Marca D'agua.
Assine e
salve.
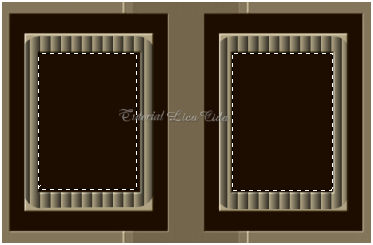
Aparecida \ licacida ,setembro de 2018.
Espero que gostem.
Obrigada!
 outra versão!!
tube:Gabry-woman 99-18
 |