
|
|
|
" Liliana "
Seleção:
OVALLC.PspSelection. ( Salve em sua pasta de seleções
My PSP Files ).
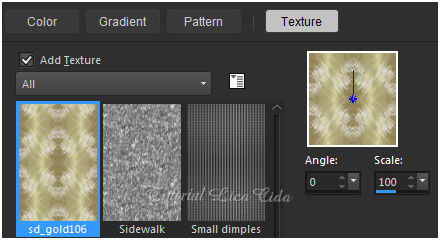
Texture: Texture
_ sd_gold106 ( Salve em sua pasta de Texture My PSP Files
).
Texture: Texture
_02-5b569-
Pattern_gold (22) (
Salve em sua pasta de Pattern My PSP Files
). Tubes:mentali-misted1424 \10mist_paysage_animabelle
.
Back
:backcristal.
Deco:
Birds of a Feather II_33\ nuvens.
(Agradeço)
Marca
D'água . Efeitos do PSP.
Versão usada PSPX8.
Plugin
Plugin
Nick Software\ Color EfexPro 3.0 .
Tutorial
_Roteiro
1-Abrir nova imagem transparente de 1000
x 800 pxls.
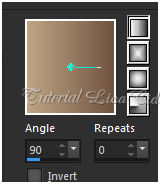
_Preencher com o gradiente formado
pelas cores : #bea584 e #715341. Configurar Linear.
Angle 90
\ Repeats 0. Invert desmarcado.
 2-Na mesma layer com o Flood
Fill Tool , aplicar a Texture _dar três \quatro pinceladas
.
(não
esqueça de marcar Add Texture)
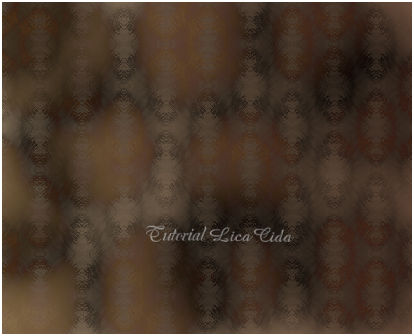
3-Ativar a Ferramenta Dodge Brush. Configurar:
 _Pincele sobre a layer suavemente com
o botão direito ( cor escura ) do mause. Realce a gosto a
Texture .
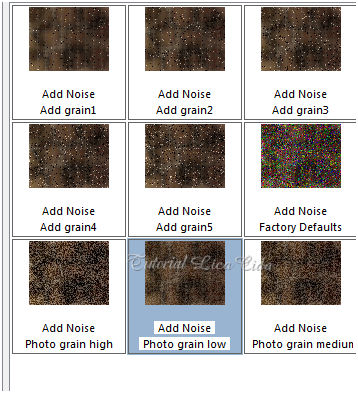
4-Effects\ Effects Browser...Add
Noise\ Photo grain low.
 5- Edit Copy
na 10mist_paysage_animabelle \ Paste As New
Layer.
_Adjust\ Sharpness\ Sharpen
More.
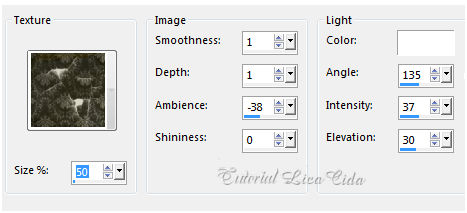
6- Effects\Texture Effects\ Texture (
02-5b569- texture
).
 _ Adjust\ One Step Photo Fix ( repetir
)
( você
irá arrumar o mist depois do usar o tube principal ).
7-
Edit Copy nas nuvens anexada\Paste As New Layer. Objects\
Align\ Top.
_ Adjust\ One Step Photo Fix.
_Blend
Mode= Luminance(L) . Layer\ Arrange Move Down.
8-
Ativar a layer superior ( raster2 ).
_Nova
Layer .
_Selections \Load \ Save Selection \ Load
Selection From Disk \ Load \ovallc.PspSelection. _Preencher com a Pattern gold (22) ou use a
gosto.
 _Selections\ Modify\ Contract 4.
Delete.
9-
Nova layer.
_ Preencher com a color=foreground ( #bea584
).
_Selections\ Modify\ Contract 28.
Delete.
10-Nova layer.
_Preencher com a Pattern gold (22) ou use a
gosto.
_Selections\ Modify\ Contract 4.
Delete.
Selections\ Select none.
11-Ativar a Raster5.
_ Effects\Texture Effects\ Texture ( 02-5b569-
texture ) ( print ítem 6 ).
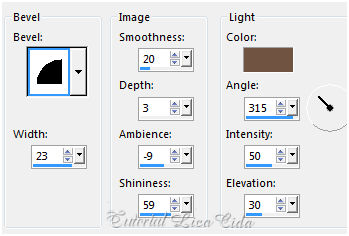
12-Effects\ 3D Effects\ Inner
Bevel.
(Color= background )
 _Ativar a layer superior (
Raster 6 ) . Layer\ Merge Down ( duas vezes
).
13- Selecionar com a
ferramenta Magic Wand _ Default a parte interior da seleção
oval.
_Selections\
Modify\ Expand...12
pxls.
14-Nova layer.
_ Edit Copy mentali-misted1424 \
Edit Paste Into Selection . Selections\ Select none.
_ Adjust\ One Step Photo Fix .
*
arrumar a paisagem a gosto.
15-Edit Copy Birds of a Feather II_33\Paste As New
Layer. Posicione.
_Layer\ Merge\ Merge Down.
_Raster4 _Effects \ 3D
Effects \ Drop Shadow 0\ 0\ 80\
40,00. Color=000000.
16-Ativar a Raster1 . Layer
duplicate.
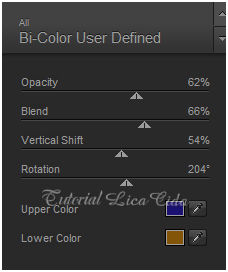
_Plugin Nick Software\ Color
EfexPro 3.0\ Bi-Color User
Defined.
 17-Ativar a Raster1. Edit
Copy no cristalback. Paste As New
Layer.
_ Layer duplicate \ Layer arrange bring to
top.
18- Effects\ Photo Effects\ Time
Machine
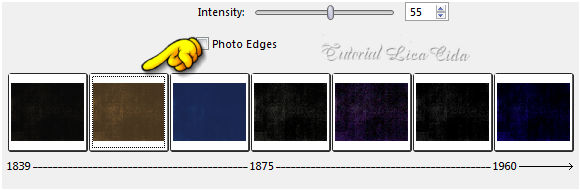 Layers\ blends\ opacitys
 _Ativar a layer superior.
19-Image add borderes 1 pxl \ color
background ( escura ).
_Image
add borderes 1 pxl \ color foreground ( clara
).
_Select All. Edit
Copy.
_Image add borderes 40
pxls \ color= #ffffff.
Invert.
_Edit Paste Into Selection
.
_Adjust\ Blur \ Gaussian
Blur.
R=28,00.
_ Effects\Texture Effects\
Texture ( 02-5b569- texture )( print ítem 6). Adjust\ Sharpness\ Sharpen
More.
Invert.
_Effects \ 3D Effects \ Drop
Shadow 0\ 0\ 80\
40,00. Color=#000000.
_Selections\ Select
none. ********************************
Aplicar a Marca D'agua.
Assine e
salve. Aparecida \ licacida , maio de 2017.
Espero que gostem.
Obrigada!!
  |