|
|
|
"Glow"
Preset Illumination\Lights_IRELANDLIGHT. ( DW ) ( Guardar em sua pasta de Presets My PSP Files). Script_clemence ( guardar em sua pasta de Scripts Restricted).
Back: free_back_ildiko (4).
Mask:
mask LF-Mask-91.
Tubes:2543 - woman - LB TUBES
\Deco_Phylo_duo_CibiBijoux.
Deco:
@ildiko_create_text_017
\@ildiko_create_deco_free_008
\@ildiko_create_deco_free_006\Ildiko_Deco_free_009 \waves1-sa_1.
(
Agradeço )
Marca
D'água . Efeitos do PSP.
Versão usada PSPX8.
Plugins
Plugin
VM Toolbox .
Plugin Mehdi.
Plugin
Carolaine and Sensibility.
Plugin AFS Import Tutorial _Roteiro
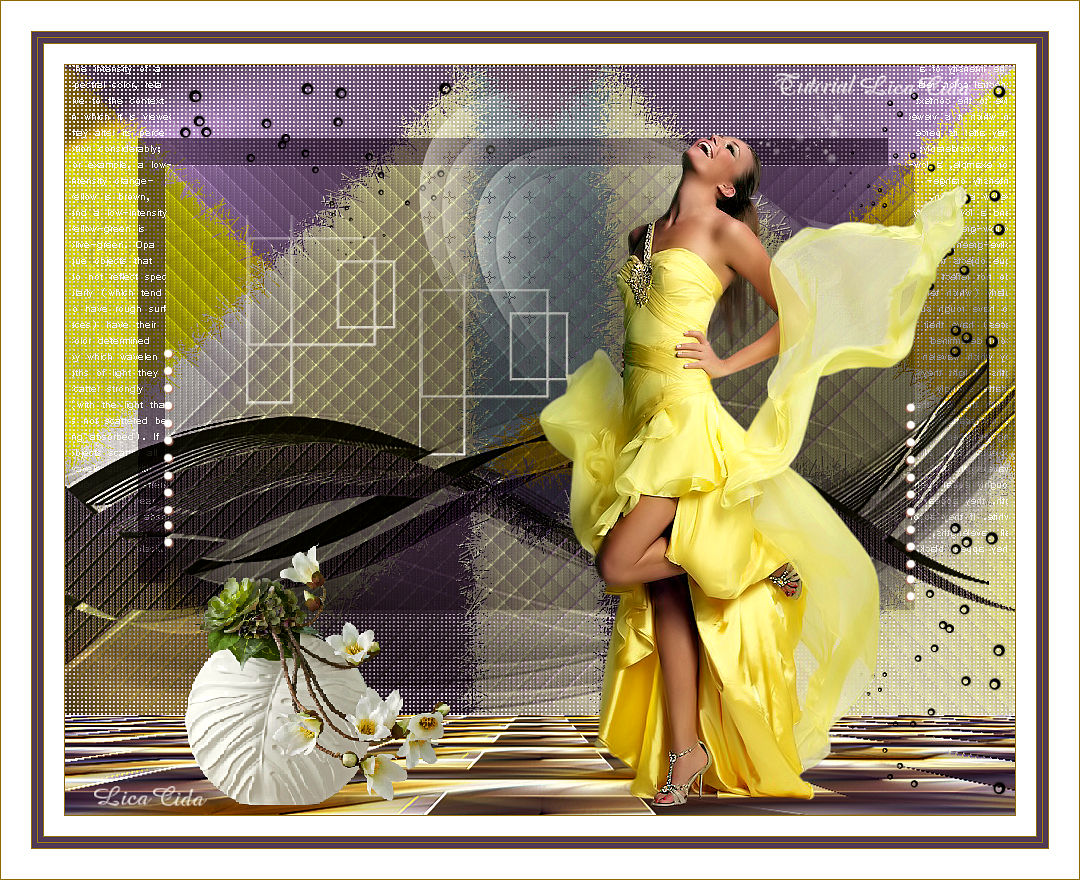
1-Abrir uma nova imagem
transparente de 950 x 650 pxls.
_ Select All. Edit Copy
no free_back_ildiko (4) \ Edit Paste Into Selection .
Selections\ Select none.
_Layer
duplicate.
2- Plugin VM Toolbox \ Trimosaic ...110 \
110.
_Effects \Reflection
Effects \ Rotating Mirror . H = 0 \ R=
180 \ Repeat.
3-Plugin Mehdi \ Fur
...50\ 20.
4-Plugin FMTT \
Saturation Emboss_Default.
_Emboss3.
*Retire duas cores do
quadro formado. Use a mais clara no foreground ( #987d29 ) e a mais escura
no
background (#544261
). 5-Nova Layer,
preencher color mais escura =#544460.
_ Effects\ Texture
Effects\ Blinds.
(color=#000000)
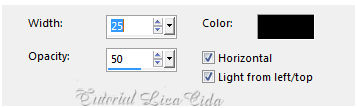 _Effects \
Geometric Effects \ Skew ...Vertical \ A=45\ Repeat.
6-Plugin Carolaine
and Sensibility\ CS-LDots ... Default ( 50\3\2
) .
_Effects \Reflection
Effects \ Rotating Mirror . H = 0 \ R=
180 \ Repeat.
_Layer Duplicate.
Image Mirror Vertical.
_Opacity 50%.
Layer\ Merge\ Merge Down.
_Emboss3.
_Layer
duplicate.
7-Aplicar a
mask LF-Mask-91.
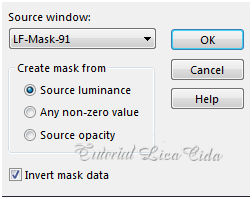 _Layer \
Merge Group.
_Effects\3D Effects\ Drop Shadow. (menos )
-27\ ( menos) -27\ 100\ 0 . (Color=#000000).
_Blend Mode=
Multiply. Emboss3.
8-Ativar a
Raster2.
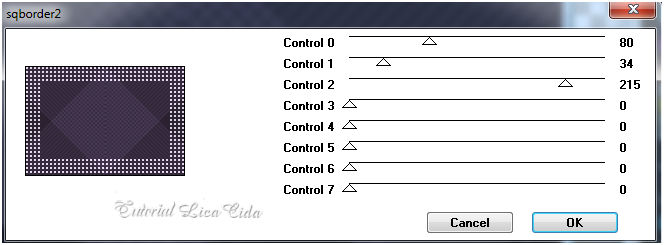
_Plugin AFS
Import\sqborder2.
 _Plugin Transparency \ Eliminate Black
.
9- Seleção
Personalizada.
 _Promote Selection
to Layer.
_Effects\3D Effects\ Drop Shadow. (menos )
-27\ ( menos) -27\ 100\ 0 . (Color mais escura
=#544460).
_Blend
Mode=Multiply . Emboss3.
_Selections\ Select
none.
10-Ativar
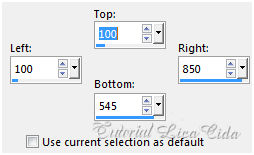
a raster1.
_Image\ Canvas Sise 950
x 750 _Bottom 100.
_ Edit Copy .
_Selecionar a parte transparente com
a ferramenta Magic Wand_ Default.
11-Nova Layer
. Edit Paste Into
Selection.
_Plugin MuRa's Meister \Perspective
Tiling _Default.
_Emboss3. Selections\ Select
none.
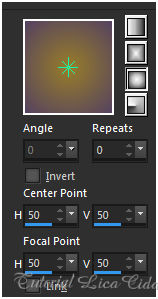
12- Nova Layer\ Send to
bottom.
_Preencher com o gradiente formados
pelas cores escolhidas acima. Configurar Sunburst \Repeats 0. Invert
desmarcado.
CP: H e V= 50 \ FP: H e
V=50.
 13-Ativar a Copy of Raster1.
_Effects\ Illumination Effects\
Preset Illumination\ Lights\ IRELANDLIGHT.Layers\Blends\
Opacitys 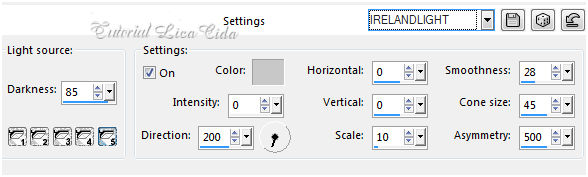 _Layers\Blends\ Opacitys.
 14- Edit Copy no 2543 - woman - LB
TUBES\ Paste As New Layer.
Posicione.
15-Edit Copy no Deco_Phylo_duo_CibiBijoux\ Paste As New Layer. Resize
\ Posicione.
16-Edit Copy
nos decos anexados\ Paste As New
Layer. Use a gosto.
17-Correr o
Script "clemence" usando cores a gosto.
*Procurar o script "clemence"
*Clique para
corrê-lo em Run Selected Script.
(e\ou_ use borda a
gosto )
18- Plugin AAA
Filters_Custom \Landscape.
Aplicar a Marca D'agua.
Assine
e salve. Aparecida \ licacida , janeiro de
2017.
Espero que gostem.
Obrigada!! 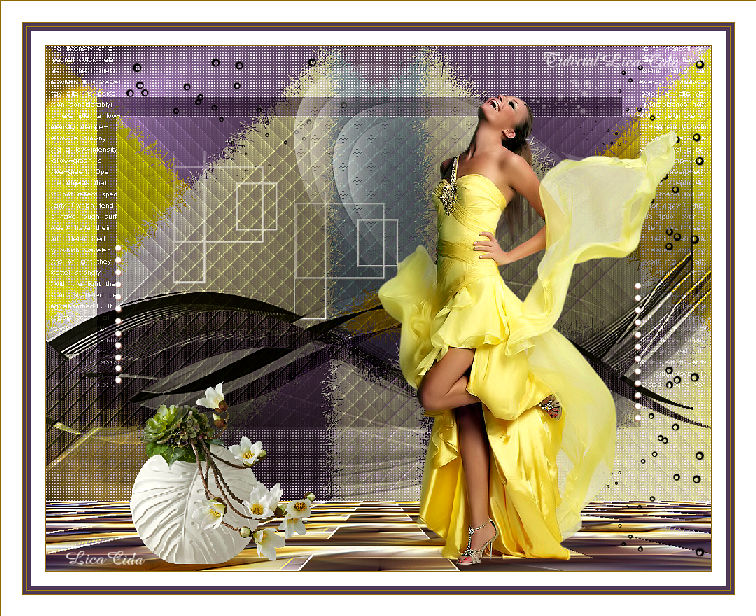  |