|
|
|
"Sisters"
Script_ riscos-lica ( Guardar em sua pasta de Scripts Restricted ). Preset Illumination\Lights_hurts (mp) ( Guardar em sua pasta de Presets My PSP Files). Tubes: OBG_GIRL_900 \89_paysage_p3_animabelle\
passaros .
Mask:!!!!.mask.ket-fadesuave.
*Agradeço.
Deco
:pedraslc
Marca
D'água . Efeitos do PSP.
Versão usada PSPX8.
Plugins
Plugin Alien Skin Eye Candy 5.
Plugin
MuRa's Meister.
Plugin
Redfield.
Tutorial_Roteiro
1- Abrir uma nova imagem
transparente de 1024 x 700 pxls.
_Correr o
Script riscos-lica.
 *Procurar o script
riscos-lica
* Clique para corrê-lo
em Run Selected Script . _Caso
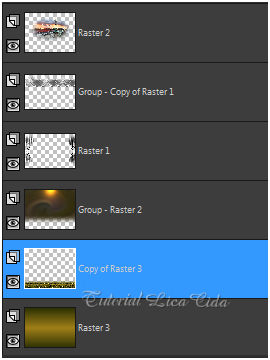
não rode o script , segue anexado. Observe \ temos 3(
tres) layers.
2- Nova Layer\ Send to bottom.
( caso trabalhe com os riscos
anexados \ ativar a raster2 )
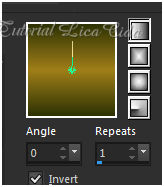
_Preencher com o gradiente linear ,
usando as cores #9f7e19 e #2e3305. Angle 0\ Repeats 1. Invert
Marcado.
 3- Ativar a Raster1.
_Layer Duplicate\ Image Mirror
Horizontal.
_Layer\ Merge \ Merge
Down.
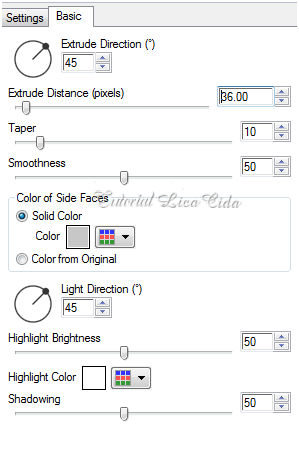
4- Plugin Alien Skin Eye Candy
5: Impact \Extrude.
5-Effects\ Geometric
Effects\ Spherize . S=100 \ Ellipse.
_Layer\ Duplicate . Resize 90%
.Layer Merge \ Merge Down.
6- Ativar a Copy ( 2 ) of Raster1.
Layer Merge \ Merge Down.
_ Effects \ Distortion Effects\
Polar Coordinates _Polar to Rectangular.
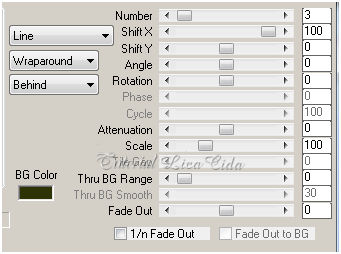
7- _Plugin MuRa's Meister \Copies.
*Line
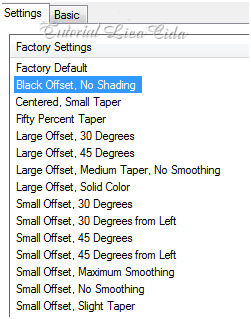
8-Plugin Alien Skin Eye Candy 5: Impact
\Extrude.
( Color= #c7c7c7 ).
 9-
Aplicar mask.ket-fade suave .Duplicar duas vezes . Layer \ Merge
Group.
_Image
Mirror Vertical.
_Effects\ Image Effects\Offset H=0 \ V= 115. Custom
e Transp. marcados.
10-
Ativar a raster2.
_Selections\ Select All. Edit
Copy 89_paysage_p3_animabelle \ Edit Paste Into
Selection. Selections\ Select
none.
_Effects\ Image Effects\
Seamless Tiling: default. 11-
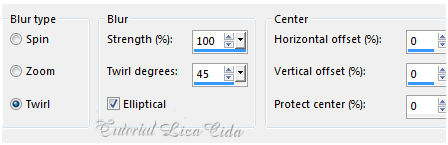
Adjust\ Blur\ Radial Blur.
 _Adjust\ Add/ Remove Noise \ JPEG Artifactal
Removal... ( Maximum\ C=80) .
_Plugin FMTT\ Blend
Emboss. 12-Effects\
Illumination Effects\ Preset Illumination\ Lights\
hurts.  _ Aplicar mask.ket-fade suave . Duplicar.
Layer \ Merge Group.
13-
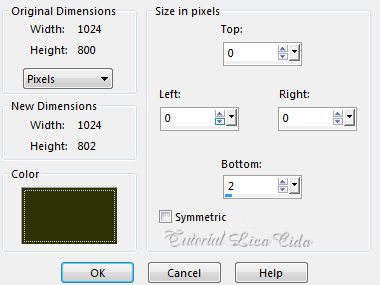
Image\ Canvas Size. 1024 x 800 . Bottom100 pxls.
14-Edit Copy 89_paysage_p3_animabelle\ Paste
As New Layer. ( deve estar na memória ).
_Layer\ Arrange\ Bring to Top. Image\ Mirror
Horizontal.
_Adjust\ Sharpness\
Sharpen More.
15-Nova Layer\ Send to bottom. Preencher com o
mesmo gradiente formado no ítem 2.
_Layer\ Duplicate.
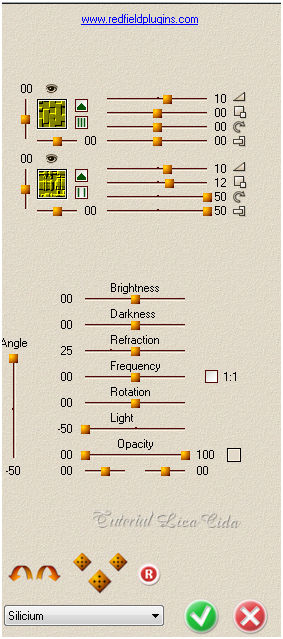
16- Plugin Redfield \ Craquelure 3D.
 17- Plugin MuRa's Meister \Perspective
Tiling. Height 22 \ outros valores_Default.
_Repetir o MuRa's Meister \Perspective Tiling (
mesmos valores).
*Com a Ferramenta Magic Wand \ Feather 70 \ Clique na parte transparente . Deletar ( quatro\ cinco vezes , suavizar o efeito ). Selections \ Select none. _Adjust\ Sharpness\ Sharpen More.
layers.
18 -Duplico a Group- Raster2.
_Plugin Nick
Software\ Color EfexPro 3.0\ Bi-Color Filters\ Color Set \
Brown1.
_Blend Mode=
Multiply.
19 -Duplico a Raster2. ( paisagem
).
_Plugin Nick
Software\ Color EfexPro 3.0\ Bi-Color Filters\ Color Set \ Cool
Warn2.
20-Edit Copy nas
pedraslc \ Paste As New Layer. Posicione .
( usar as pedras se
necessario...de acordo com sua paisagem)
_Deverá estar abaixo
da Raster2.
* Plugin Alien Skin Eye Candy 5 : Impact\
Perspective Shadow_Blurry.
( aplicar nos dois
efeitos )
21-Image add
border 2 bottom \ #2e3305.
 22- Image add border 30
bottom \ color= #ffffff
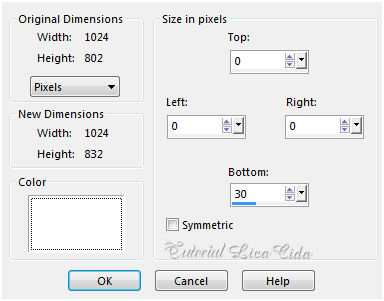 _ Selecionar
essa borda com a Ferramenta Magic Wand _Default\ preencher com o
gradiente formado no ítem2.
23- Repetir ítem 16 . Plugin Redfield \
Craquelure 3D ( veja print
). _Adjust\ Sharpness\ Sharpen More.
Selections \ Select
none.
24- Edit Copy
no tube OBG_GIRL_900\ Paste As New Layer.
Resize
80% \ Posicione.
_Adjust\ Sharpness\ Sharpen More.
*Repetir ítem 21\ Image add border 2 bottom
\ #2e3305.
25-Image \ Add Borders \30 pxls
symmetric marcado. Color= #ffffff.
_Selecione. Preencher com o mesmo
gradiente.
_Invert. _Effects\3D Effects\ Drop Shadow. 0\ 0\ 80\ 40,00 . (Color=#000000) . _Selections\ Select none.
**Plugin AAA Filters\ Custom_Landscape
. Aplicar a Marca
D'agua.
Assine e
salve.
Aparecida /
licacida, março de 2017.
Espero que
gostem.
Obrigada!
  |