|
|
|
" Dose de Ilusão "
Tubes:
OBG_GIRL_728 \ 37_carnaval_animabelle_p1\
thaliris_pausecafe_el32a\b\c.
(Agradeço)
Imagem:
THOMAS-MORAN-ENTRANCE-TO-THE-GRAND-CANAL-VENICE ( 2 ) ( colhida net
)
Mask:gradientedw.
Marca
D'água . Efeitos do PSP.
Versão usada PSPX8.
Plugins
Plugin
MuR'as Meister\ Copies.
Plugin
MuRa's Meister \Perspective Tiling.
Plugin Simple\ Zoom Out and
Flip.
Plugin
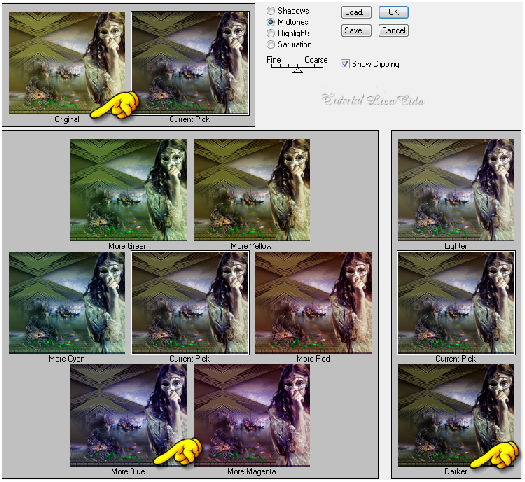
\Adjust\ Variations... Tutorial _Roteiro
1-Abrir nova imagem transparente de 1000 x 700
pxls.
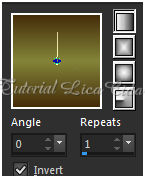
_Preencher com o gradiente formado pelas
cores #838438 e
#452d0b. Configurar Linear :
Angle 0
\ Repeats 0. Invert desmarcado.
 2- Selections\ Select All . Selections\ Modify
\ Contract 13 pxls. Invert \
Delete.
3-Selections
\ Invert. Selections\ Modify \ Contract 13
pxls. Delete . Selections\ Select none.
4- Plugin MuR'as Meister\
Copies_Throw.
 _Effects
\Reflection Effects \ Rotating Mirror . H = 0 \
R= 180 \
Repeat.
_Effects\ Edge
Effects\ Enhance More.
5-Image\ Canvas Sise 1000
x 850 _Bottom 150.
6- Aplicar a mask gradienteDW\
Duplicar.
_Layer\ Merge\
Group.
_Effects \ 3D Effects \ Drop
Shadow ( menos )-10\ 20\ 80\
60,00. Color=000000.
7-Nova Layer .Layer\ Arrange\ Move
Down.
_Preencher com o mesmo gradiente
formado no ítem1.
_Selections\ Select All .
Edit Copy na imagem (
tube) THOMAS-MORAN-ENTRANCE-TO-THE-GRAND-CANAL-VENICE ( 2
)
\ Edit Paste Into Selection. Selections\ Select
none.
8- Effects\ Texture Effects\
Tiles.
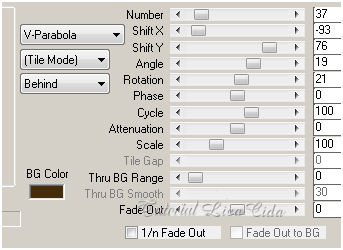
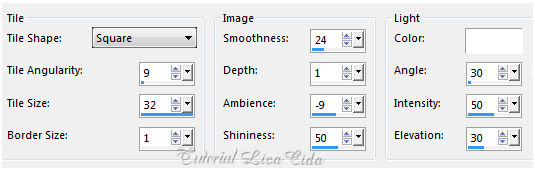 9-
Plugin MuRa's Meister \Perspective Tiling. Height 22 \ outros
valores_Default.
*Com a Ferramenta Magic Wand \ Feather 70 \ Clique na parte transparente . Deletar ( quatro\ cinco vezes , suavizar o efeito ). Selections \ Select none. _Effects\ Image Effects\ Seamless Tiling: *Side by side. _Emboss3. 10- Nova Layer\ Send to Bottom. _Preencher com o gradiente formado pelas cores
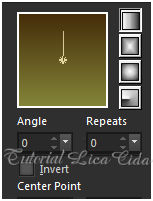
acima. Mudar
Repeats1 . Invert marcado.
_Adjust\ Add/ Remove Noise \ JPEG Artifactal
Removal... ( Maximum\ C=79) .
_Plugin FMTT\ Blend
Emboss. 11-Edit Copy na
imagem THOMAS-MORAN-ENTRANCE-TO-THE-GRAND-CANAL-VENICE ( 2 )\
Paste As New Layer. ( a imagem deverá estar na memória )
_Adjust\ Sharpness\ Sharpen
More.
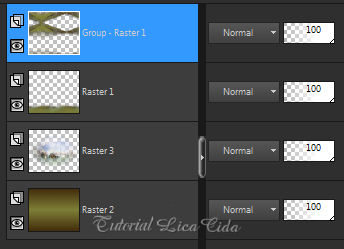
12-Ativar a Group Raster1 ( a layer
superior ).
_Effects\ Geometric Effects\
Perspective-Horizontal. D=90 \ Transp.
13- Plugin Simple\ Zoom Out
and Flip.
_Adjust\ Sharpness\ Sharpen
More. _Effects \ 3D Effects \ Drop
Shadow 10\ ( menos) -20\ 80\
60,00. Color=000000.
Layers
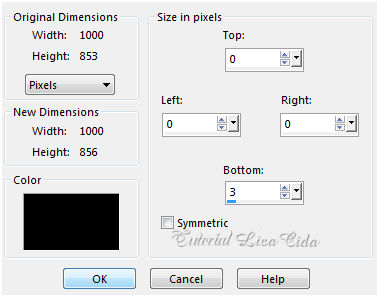
 14- Image add border 3
bottom \ color= #000000.
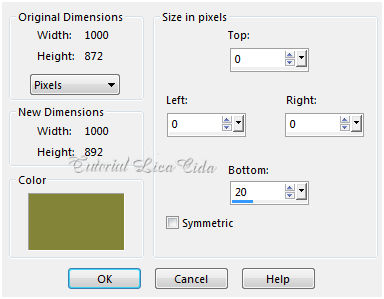
 15- Image add border 20
bottom \ color= #838438.
 16- Selecionar essa borda com a Ferramenta Magic Wand _Default e
aplicar o Effects\ Texture Effects\ Tiles .
( veja print ítem 8 ). _Emboss3.
Selections \ Select
none.
17- Edit Copy no tube
OBG_GIRL_728\ Paste As New Layer.
Mirror\ Posicione.
_Adjust\ Sharpness\ Sharpen More.
18- Edit Copy no tube
37_carnaval_animabelle_p1\ Paste As New
Layer.
Use e posicione a
gosto.
_Adjust\ Sharpness\ Sharpen .
19-Edit Copy nos thaliris_pausecafe_el32a\b\c
\ Paste As New Layer.
Use a
gosto.
20- Image add border 3
bottom \ color= #000000.
 21-
Plugin \Adjust\ Variations...
_use a
gosto.
 Aplicar a Marca D'agua.
Assine e
salve. Aparecida \ licacida , fevereiro de
2017.
Espero que gostem.
Obrigada!! 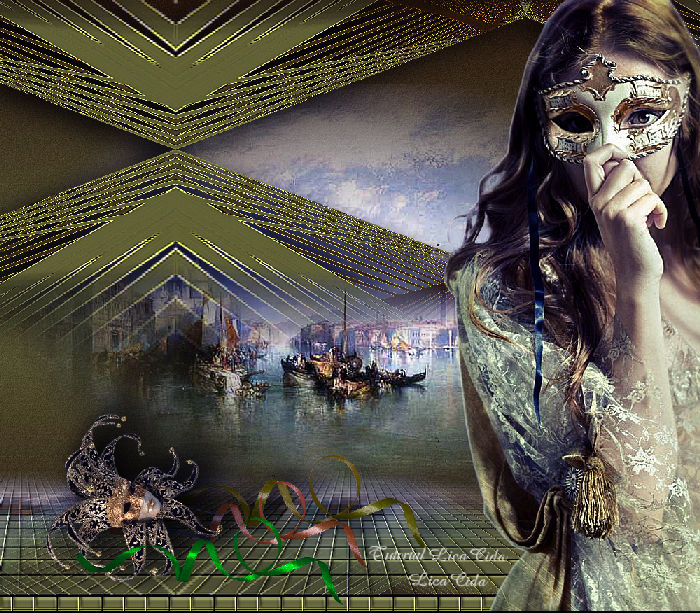  |