
Versões Amigas
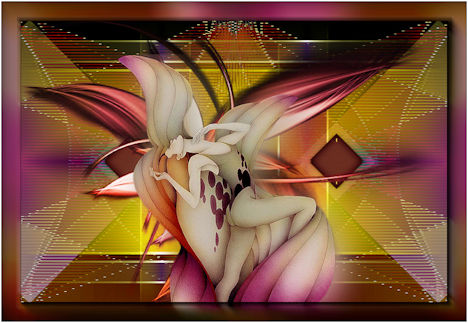
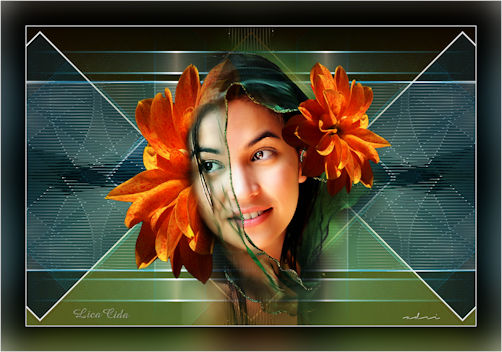
"Flowers"
Tutorial escrito por Adri e lica.
Tubs:
tubechg_5_28042010 \tube 309-luzcristina
Decô:decolc1\ decolc2\ decolc3
(opcional) Marca
D'água . Efeitos
do PSP.
Versão usada
PSPX8. Plugins
Plugin Simple.
Plugin UnPlugged Shapes.
Plugin Galaxy.
Plugin Mehdi. Tutorial _Roteiro 1-
Abrir uma nova imagem
transparente de 900 x 600 pxls.
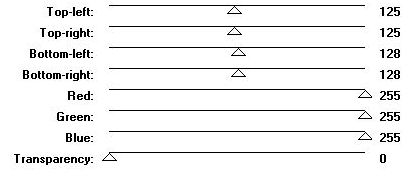
_Preencher como o gradiente formado pelas
cores: Foreground #442006 e Backgroud
#029acf.
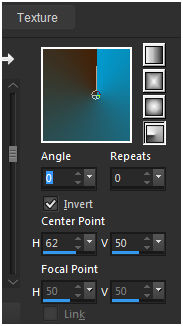
Configurar Radial. Angle 0
\ Repeats 0. Invert marcado.
CP=H 62 V 50.
 _Adjust blur \ Gaussian Blur .
R=29,00.
2- Plugin Simple \ Blintz.
3-Plugin Simple \4 Way Average.
_Effects\ Edge Effects\ Enhance
More.
4-Layer \Duplicate.
_Plugin UnPlugged Shapes\45 Degree Rectangle
.
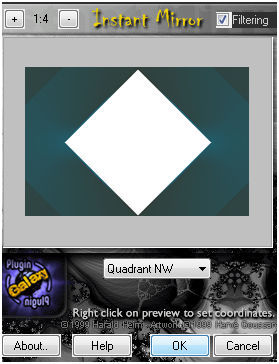
 5-Plugin Galaxy\Instant Mirror.
 _Selecionar o losango formado, com a
ferramenta Magic Wand_Default.
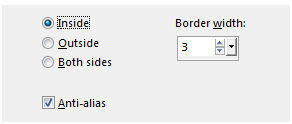
6-Selections\ Modify \ Contract 3
pxls. Deleta. Selections\ Select none.
_Effects\ Image Effects\ Seamless Tiling: Side by
side.
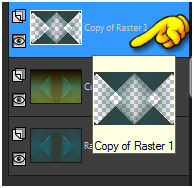
7- Repetir ítem 5 (Plugin Galaxy\Instant
Mirror_veja print).
8-Seleção Personalizada.
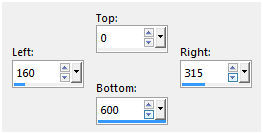 9-Selections\ Modify\ Select Selection
Borders...
 10-Nova layer. Preencher color=#ffffff a
borda formada.
Selections\ Select none.
*Com o Flood Fill ativado, opacity 20%
preencher o restante do efeito. (mesma
cor=#ffffff).
Veja print.
 11-Effects\Geometric Effects\
Circle_Transparent.
12-Plugin Mehdi\ Weaver.
 _Repetir ítem 5.
_ (Plugin Galaxy\Instant Mirror_Veja
print).
13-Seleção Personalizada.
 _ Repetir ítem 9.
Selections\ Modify\ Select Selection
Borders... (veja print).
14- Nova layer. Preencher
color=#ffffff a borda formada. ( opacity 100%)
Selections\ Select none.
*Com o Flood Fill ativado, opacity 20%
preencher o restante do efeito.
Veja print.
 _Effects\Geometric Effects\
Circle_Transparent.
( ítem 11 )
_ Repetir ítem 12 ( Plugin Mehdi\
Weaver_Veja print ) .
_Repetir ítem 5.
_ (Plugin Galaxy\Instant Mirror_Veja
print).
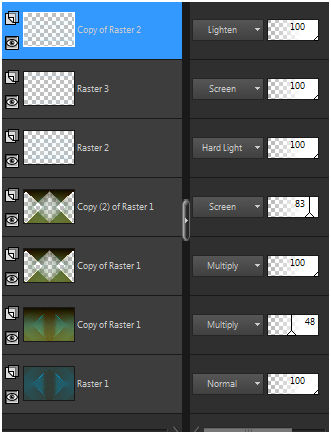
15- Ativar a Raster2. Layer\
Duplicate.
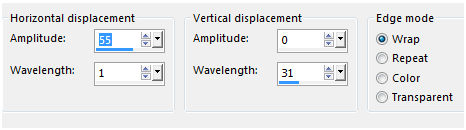
_Effects\ Distortion
Effects\Wave.
 _Layer\Arrange \ Bring to Top.
16-Ativar a Raster1 . Layer Duplicate.
_Plugin Nick Software\ Color EfexPro 3.0\
Bi-Color Filters\ Color Set \ Brown 1. 17-Aplicar o efeito na copia.
(ítem16)
 _ layer\ duplicate.
Layers\ Blends\ Opacitys.
 18- Ativar a Raster superior. Edit
Copy no decolc1\Paste As New Layer .
19- Edit Copy no decolc2 \Paste As New
Layer .
20- Edit Copy no
tubechg_5_28042010 \ Paste As New Layer .
_Resize 88%.
21-Edit Copy no tube 309-luzcristina \
Paste As New Layer.
Layer\ Arrange \ Move Down.
Layer\Duplicate\ Resize 60% \ Image\Mirror\ Mirror
Horizontal.
Layer\ Arrange \Bring to Top,
Acerte a gosto
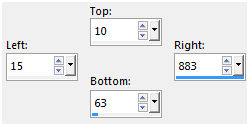
 _Image add
border 1 pxl cor =#ffffff
Layer\
Duplicate.
22-Layers\New Adjustment Layer\ White
Balance. 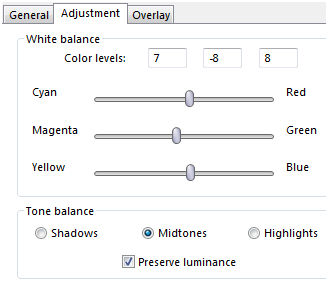 _Blend Mode=Overley\ Opacity
40%.
_Layer\ Merge \ Merge Visible.
_Edit Copy.
_ Image
add border 50 pxls \ preencher cor =#clara.
Selecione.
_Edit Paste
Into Selection.
_Adjust blur \ Gaussian Blur .
R=29,00. Invert.
_Effects \ 3D
Effects \ Drop Shadow 0\ 0\ 80\
40,00. Color=000000.
_Selections\
Select none. 23-Image add
border 1 pxls cor =#ffffff.
(segue
decolc3_opcional).
_ Resize 950 pxls\
Width
Aplicar a Marca D'agua.
Assine e salve.
Aparecida / licacida e Adri outubro de
2015.
Esperamos que gostem.
   |
