 Versões Amigas
"Shiny Flowers" Tube: _k@rine_
Dreams_Lady_Jewel_2865_Mars_2014.
shiny_flowers_set_6_by_lileya-d2xoras_5
Marca D'água. Efeitos do PSP.
Versão usada PSPX7
Plugins
Alf's Power Grads.
VM Toolbox\ Zoom Blur.
Graphic Plus\ Cross Shadow.
Nik Software\ Color EfexPro 3.0
.
Xero\ Porcelain.
Tutorial
_Roteiro 1-Abrir uma nova imagem transparente 900
x 700 pxls.
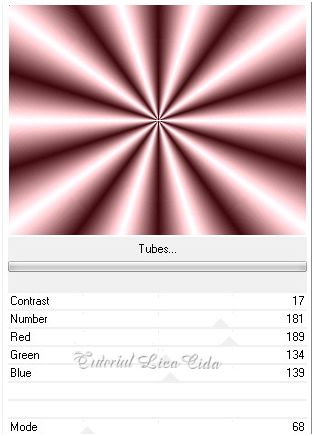
_Preencher com o gradiente formado pelas cores :
Foreground= #2b0f1a \ Background= #a7537c ( retiradas do tube )
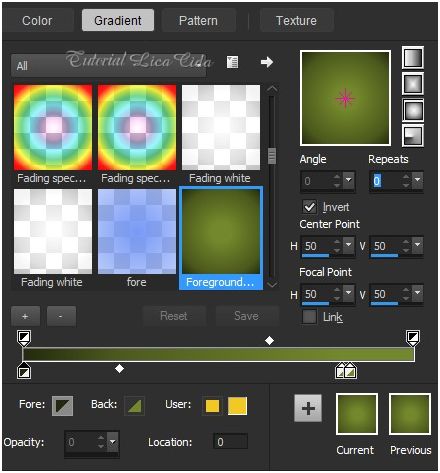
.Configurar Sunburst. Repeats 0. Invert
marcado. CP=H e V 50 \ FP=H e V 50.
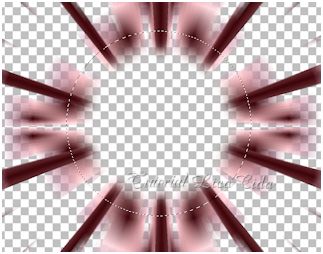
Observe print
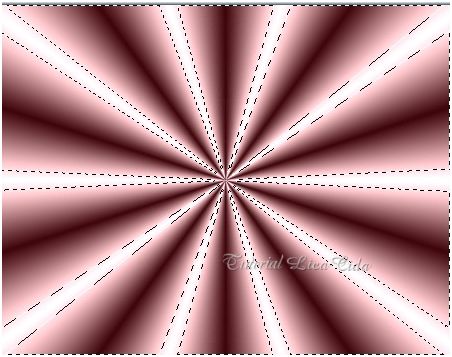
 2-Plugin Alf's
Power Grads\ Tubes...
(
controle o red, green e blue até aproximar das
cores que usou ).
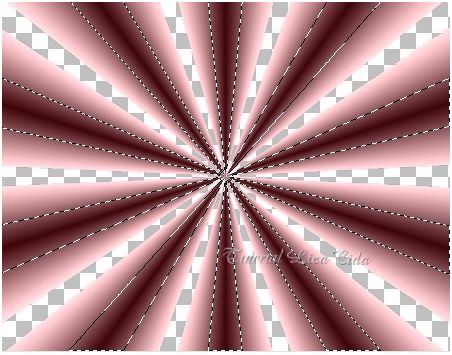
 _Selecionar com
a ferramenta Magic Wand \ Configure:
_Delete. Selections\ Select
none.
_Selecionar como print ( mesmas configurações da
ferramenta Magic Wand ).
 _Promote
Selection to Layer.
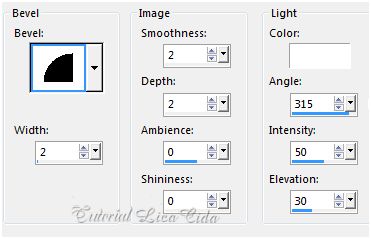
3- Effects\ 3D
Effects\ Inner Bevel.
 _Selections\
Select none.
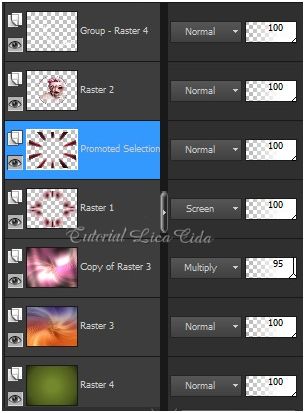
4- Ativar a
Raster1.
_ Effects\
Distortion Pinch... S=100.
_Effects\
Geometric Effects\ Circle_Transp .
_Imagem
\Resize 90%.
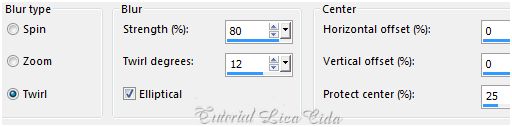
5-Plugin VM
Toolbox\ Zoom Blur_Default .
6- Ativar
a layer Promoted Selection.
_Selections \
Select All. Selections\ Modify\ Contract... 30 pxls.
_Selections\ Invert. Delete. Selections\
Invert.
7-Effects\ 3D
Effects\Chisel... S=7\ Transparent (marcado). Color a
gosto.
_Selections\ Select none.
Repetir o plugin ( ítem5
) . 8-Ativar
Selection Tools\ Configurar:  _Formado o círculo\ Delete ( as duas layers
).
 9-Ativar a layer Promoted Selection. Nova
Layer.
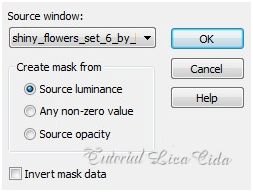
_ Edit Copy no
tube _k@rine_ Dreams_Lady_Jewel_2865_Mars_2014\ Edit
Paste Into Selection.
10- Repetir
ítem 7 ( Effects\ 3D Effects\Chisel...)
( deixe
selecionado)
11- Volto
a layer Promoted Selection .
_Selections \
Select All. Selections\ Modify\ Contract... 30
pxls.
_Selections\
Invert. Delete o efeito das duas layers.
_Selections\
Invert.
12-Repetir ítem
7 ( Effects\ 3D Effects\Chisel...)
Selections\ Select none. 13-Nova Layer. Layers\ Arrange \Send to
Bottom.
_ Preencher com o mesmo gradiente formado no ítem
1. 14-
Selections \ Select All. Edit Paste Into Selection. ( deverá o tube estar na memória).
_Selections\ Select
none.
_Effects \Image
Effects\ Seamless Tiling_Default.
_ Adjust\
Blur\ Radial Blur.
 _Layer\
Duplicate. Image\ Mirror. Image\ Flip.
15-
Nova Layer. Layer\ Arrange\ Bring to Top . Preencher com
color=#ffffff.
_New Mask
layer\ From Image...
 _Layer \ Merge \ Merge
Group.
_Effects\ Edge Effects\ Enhance.
16-Nova Layer. Layers\ Arrange \Send to
Bottom.
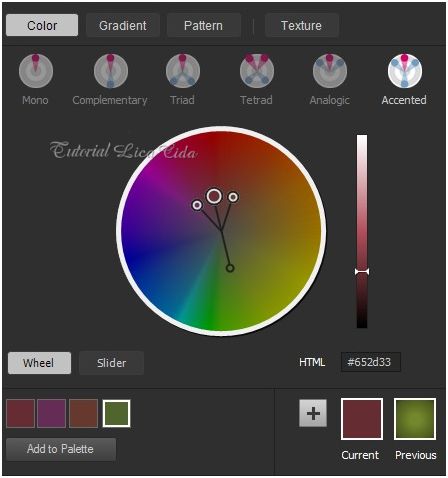
Usar no Foreground ( color #242a0e) no Background
( color#73872d_ Cores
opostas).
Quando escolher a cor clique em Accented \ aparecera sua cor principal e sua cor
oposta.
( veja print)
_Configurar Sunburst.
Repeats 0. Invert marcado. CP=H e V 50\ FP=H
e V=50.
Preencher a layer.
 17- Ativar a Raster3.
_Plugin Nik Software \Color EfexPro 3.0 \
Bi-Color Filters . Color Set : Cool\Warm2.
_Na layer duplicada\ Plugin Graphic
Plus\ Cross Shadow.
Layers\Blends\Opacitys
 18-Image \ Add Borders \2 pxls
symmetric marcado. Color= # ffffff.
_Image \ Add Borders \20 pxls
symmetric marcado. Color= #561c23 ( escura
).
19- Plugin
Xero\ Porcelain_Default.
_Image \ Add Borders \2 pxls symmetric
marcado. Color= # ffffff.
Aplicar a Marca D'agua.
Assine e salve.
Espero que gostem. Aparecida / licacida, março de
2015
  |