|
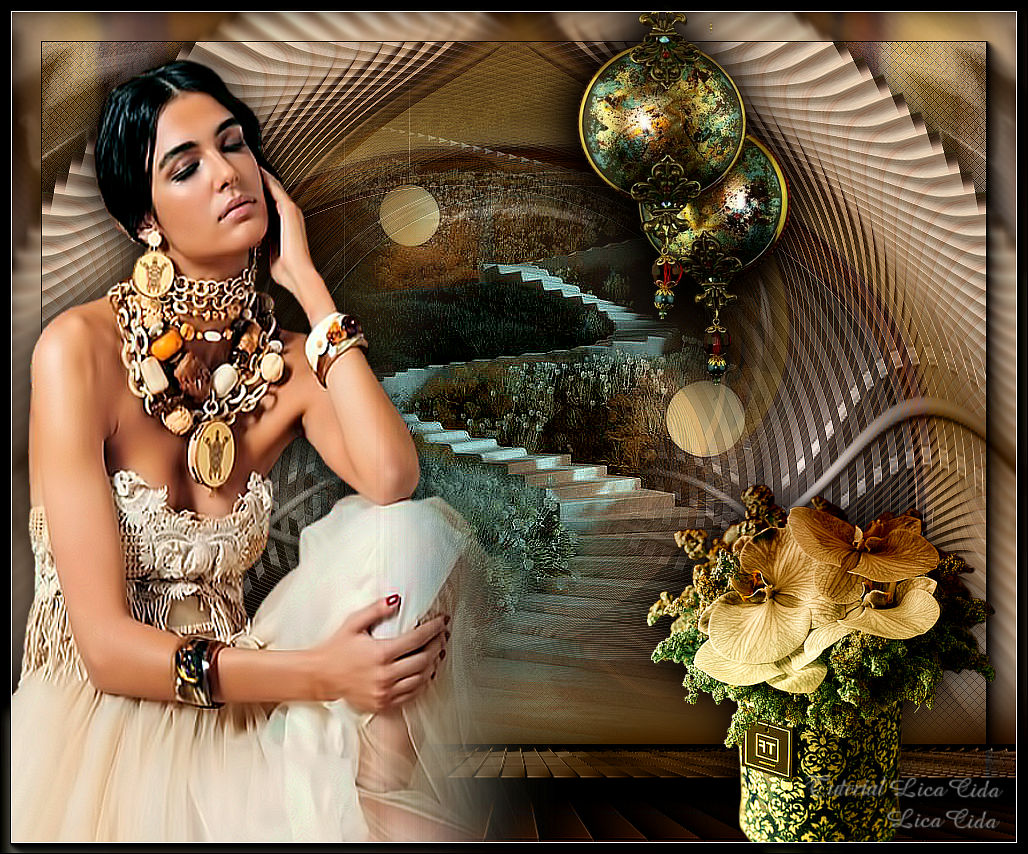
"Infinite"
Material Aqui
Tubes:7571-Luz Cristina ( usado para dar a cor desejada)\ Callitubes-2527mulheres\
Callitubes-434paisagens.
Callitubes-280flores\Callitubes-288decor.
Decor: circulo_lc\ deco_mp\ decor_nmcriações_16 _adaptado\ piso_lc.
Mask: !!!!.mask.ket-fadesuave.
(Agradeço)
Marca D'água .
Efeitos do PSP.
Plugins
Plugins MuRa's Meister
Plugins Lines -SilverLining...
Plugins AAA Frames
Tutorial
Configurar:
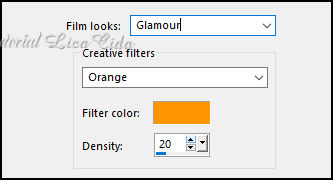
Foreground #291201 _ Background #efc45d.
1-Abrir nova imagem transparente de 1024 x 800.
2-Preencher com o gradiente Rectangular, usando as cores
configuradas acima.
Angle 0 \ Repeats 1. Invert desmarcado . CP_H e V =50 . FP_H e V=50.
3- *Procurar um tube que as cores se identificam com as configurada
acima. Aqui no caso: 7571-Luz Cristina.
_ Selections \Select All. \ Edit Paste Into Selection.
Selections/None
4-Effects\Image Effects\Seamless Tiling_Default.
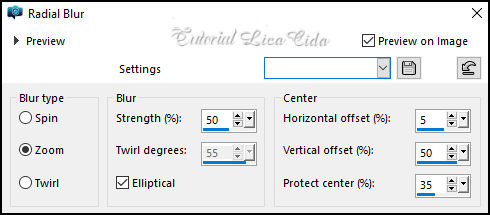
5-Adjust \Blur\ Radial Blur .
6-Adjust\ Add/
Remove Noise \ JPEG Artifactal Removal... ( Maximum\ C=80
_Plugins FMTT\Blend Emboss_Default.
7-Effects\Distortion Effects\ Polar Coordinates\ Polar to
rectangular .
Image\Mirror Vertical.
Layers Duplicate.
8-Effects\Geometric Effects\Perspective Horizontal. D=90 _Transp.
Image\Mirror Horizontal.
Edit \ Repeat : Geometric Effects\Perspective Horizontal. D=90
_Transp.
9-Effects\ Distortion Effects \Pinch ( S%) 100.
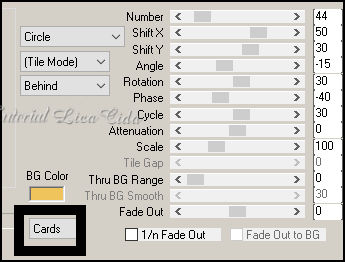
10-Plugins MuRa's Meister \Copies _Cards
11-Effects\Distortion
Effects\Twirl . D: 470.
Layers Duplicate .
12-Layers \ Properties \ General \ Opacity 50%.
Image\ Mirror Horizontal . Layers\Merge\ Merge Down.
13- Effects \ Reflection Effects \ Rotating Mirror _ 0 \180_Reflect.
*Adjust \ Sharpness \ Sharpen. Shadow a gosto.
14-Aplicar a mask \!!!!.mask.ket-fadesuave ( em anexo )\ duplicar
três vezes.
Layers\ Merge\Merge Group.
15-Edit \ Repeat: mask \!!!!.mask.ket-fadesuave na Layer
Raster1\duplicar duas vezes.
Layers\ Merge\Merge Group
16-Image Canvas Size 1024 x 850 . Bottom50.
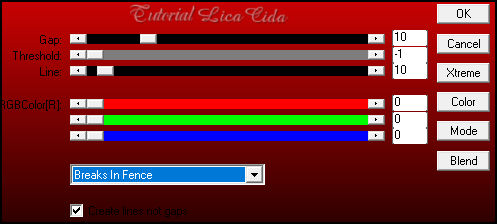
17_ Plugins AP01(Innovations) \Lines -SilverLining...
*Adjust \
Sharpness \ Sharpen.
18-Layers \ New Raster Layer.
Layers\ Arrange\ Send to Bottom. Preencher com o mesmo gradiente.
19- Edit Copy no circulo\ Paste As New Layer.( opcional )
Layers\ Arrange\ Move Up . ( já posicionado)
20-Layers \ Properties \ General \ Blend Mode Luminance (L).
21-Edit Copy no Callitubes-434paisagens\Paste As New Layer.
*Adjust \ Sharpness \ Sharpen.
22-Edit Copy no deco_mp\Paste As New Layer.
Layers\ Arrange\ Move Down .
23-Layers \ Properties \ General \ Blend Mode Luminance (L).
24- Effects\ Photo Effects\ Time Machine.
_ Edit \ Repeat: Time Machine.
Objects\ Align\
Center in Canvas . Shadow a gosto.
Layers
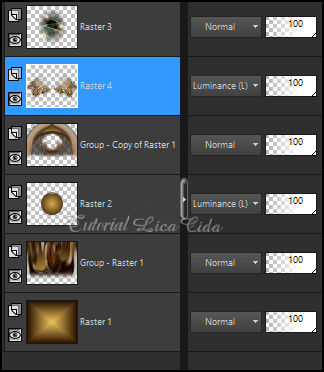
25- Ativar a
layer raster2.
Edit Copy no decor_nmcriações_16 _adaptado \ Paste As New Layer.
Objects\ Align\ Top.
26-Layers \ Properties \ General \ Blend Mode Luminance (L).
Image \ Add Borders \ 1 pxl color #000000.
27- Plugins AAA Frames_Foto Frame. Default.
28- Edit Copy no piso_lc \ Paste As New Layer.
Objects\Align\ Bottom.
29-Layers \ Properties \ General \ Blend Mode Luminance (L).
30- Edit Copy no Callitubes-2527mulheres ( 2 ) \ Paste As New Layer.
Posicione e use a gosto. Shadow como preferir.
31- Edit Copy no Callitubes-280flores \ Paste As New Layer.
Resize 80%
Posicione e use
a gosto. Shadow como preferir.
32- Edit Copy no Callitubes-288decor \ Paste As New Layer.
Resize 80%
Posicione e use
a gosto. Shadow como preferir.
Image \ Add Borders \ 1 pxl color #000000.
33- Plugins AAA Frames_Foto Frame.Width10 _Matte1 _ Restante :
Default.
Aplicar a Marca D'agua.
Assine e salve.
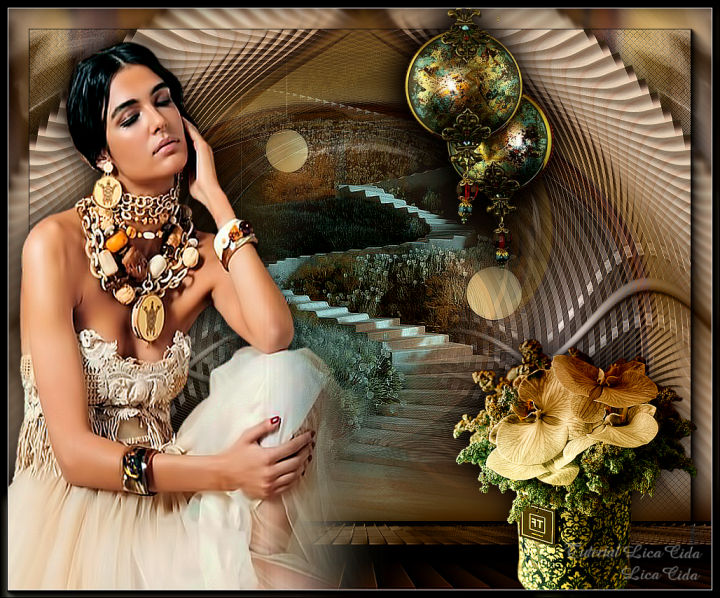
Aparecida \ licacida , outubro de 2022.
Espero que apreciem.
Obrigada!
:::...VOLTAR...:::
|