|

"Soxikibem"
Material Aqui
Preset_CloneBrush_aplicatubelica ( Guardar em sua pasta de Presets
My PSP Files ).
Tubes:061MulherByPqnaAlice\ 040PaisagemByPqnaAlice \arquivo net_aves
Callitubes-162flores (1).
Deco:decosoxikiben1_bylc
Texture: Corel_15_024.
Título "Soxikibem" bylc
(Agradeço)
Marca D'água .
Efeitos do PSP.
Versão usada PSPX9.
Plugins
Plugins UnPlugged Tools
Plugins Plugin Alien Skin
Plugins Simple
Plugins Nick Software
Tutorial
Configurar
Foreground #1a1216\ Background #875f71
1-Abra uma imagem transparente
900 x 800 px.
_ Preencher com um gradiente Rectangular, formado pelas cores
configuradas acima.
2-Selections \ Select All.
Edit Copy no 061MulherByPqnaAlice \Edit Paste Into Selection.
Selections \ Select None.
3 - Effects \ Image Effects \ Seamless Tiling: Default.
Adjust \ Blur \ Gaussian Blur. R: 24,00.
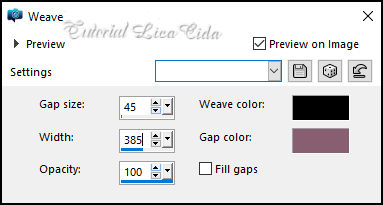
4 -Effects\Textute Effects\ Weave.
cores # 000000 \#875f71 ( background)
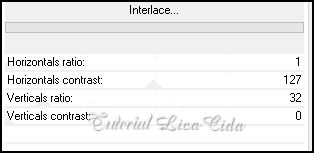
5- Plugins UnPlugged Tools\
Interface.
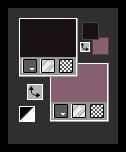
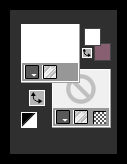
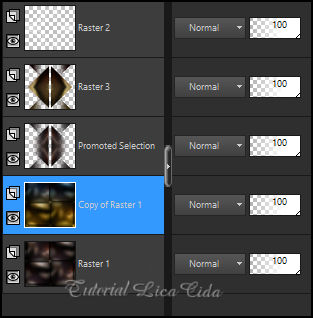
6- Selecione o quadrado como
mostra o print. Use a ferramenta Selection Tool ( S ).
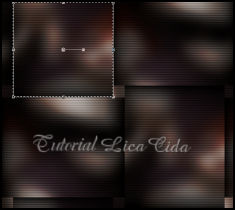
Promote Selection to Layer.
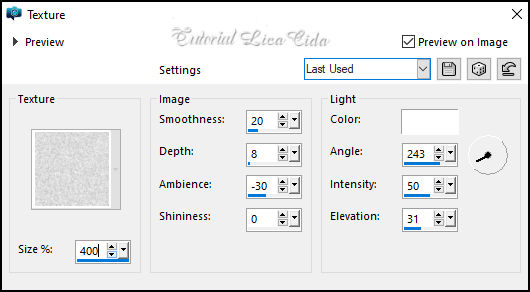
7- Effects\ Texture Effects\ Texture.
( anexada \ Corel_15_024 )
Selections none.
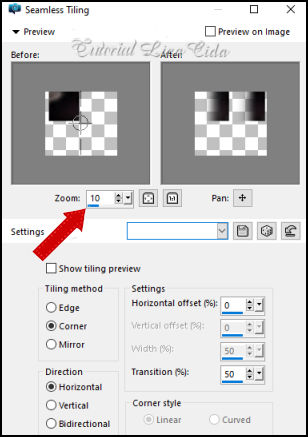
8-Effects \ Image Effects \ Seamless Tiling.
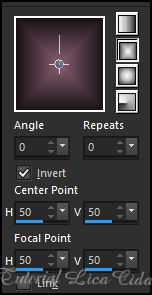
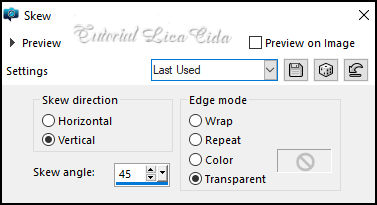
9- Effects\ Geometric Effects\Skew.
Layers Duplicate \Image Mirror
Horizontal.
Layers\ Merge\ Merge Down.
10- Plugins Simple \ Top Left Mirror.
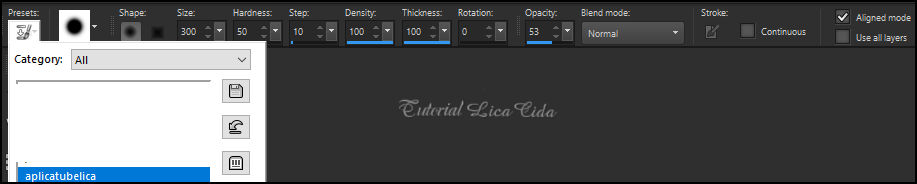
11-Layers \ New Raster Layer.
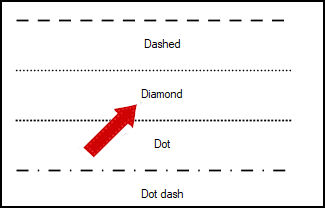
Ativar a ferramenta Pen Tool (V)


Line style : Diamond
Configurar
Foreground #ffffff\ Background _ transparent
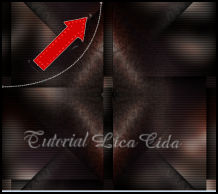
Trace uma linha como indico no
print.

Clicar na parte indicada do
quadrado , aparecerá o efeito desejado.
(*na mesma layer)
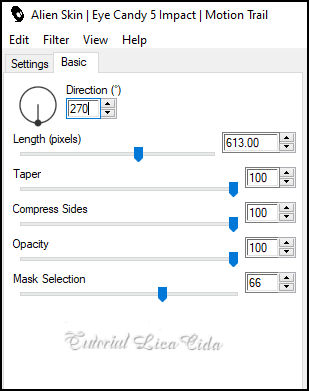
12-Plugins Plugin Alien Skin\
Eye Candy 5 : Impact \Motion Trail.
Layers Duplicate \Image Mirror
Horizontal.
Layers\ Merge\ Merge Down.
Layers Duplicate \Image Mirror Vertical.
Layers\ Merge\ Merge Down.
13-Layers Duplicate\ Image
Resize 150 % 
Layers\ Merge\ Merge Down.
( * o feito das laterais poderá sair diferente, conforme observo nas
versões testadas)
14- Ativar a layer_ Promoted Selection .
Edit \ Copy no decosoxikiben1_lc\ Paste As New Layer.
15- Ativar a layer_ raster1.
Layers Duplicate.
Plugins Nick Software\ Color EfexPro 3.0\Bi-Color Filters . Color
Set _Cool/Warm 1. ( default)
Layers
16- Ativar a layer_ raster3.
Edit Copy no 040PaisagemByPqnaAlice \Paste As New Layer.
Adjust \ Sharpness\Sharpen.
Resize 80% 
Posicione a gosto.
17-Edit Copy no arquivo net_aves\Paste
As New Layer.
18- Ativar a layer do topo.
Edit Copy no tube 061MulherByPqnaAlice \Paste As New Layer.
_Adjust \ Sharpness\Sharpen.
Resize 80%
Posicione a gosto.
19- Layers \ New Raster Layer.
Ativar o Clone Brush_aplicatube lica.
( caso não consiga no seu psp salvar o preset, observe as
configurações
_Clone o tube usado (
061MulherByPqnaAlice _Resize 80%
Apliquei ao lado do tube
original. Use a vontade.
Layer Arrange Move Down.
20-Opcional
Aplicar no tube clonado: Plugins AAA Filters _ Custom\ Landscape (
default) .
21-Edit Copy no Callitubes-162flores \Paste As New Layer.
Posicionar .
22-Edit \ Copy no Titulo Soxikibem by licacida.\ Paste As New Layer.
Posicionar à sua escolha
Borders
Image \ Add Borders \ 1 pxls cor Foreground #1a1216.
Image \ Add Borders \ 10 pxls cor #ffffff.
Image \ Add Borders \ 1 pxl cor Foreground #1a1216.
.
Image \ Add Borders \ 20 pxls cor #ffffff.
Image \ Add Borders \ 1 pxl cor Foreground #1a1216.
.Image \ Add Borders \\30 pxls cor #ffffff.
Image \ Add Borders \ 1 pxl cor Foreground #1a1216.
Aplicar a Marca D'agua.
Assine e salve.
Aparecida \ licacida setembro de 2022.
Espero que apreciem.
Obrigada!

:::...VOLTAR...:::
|