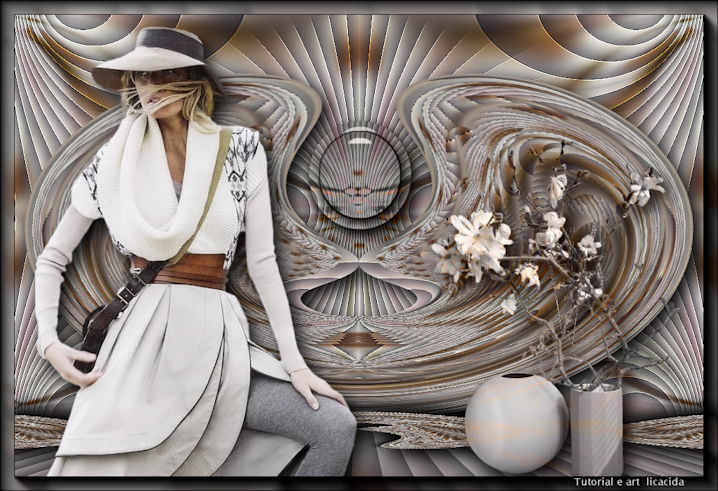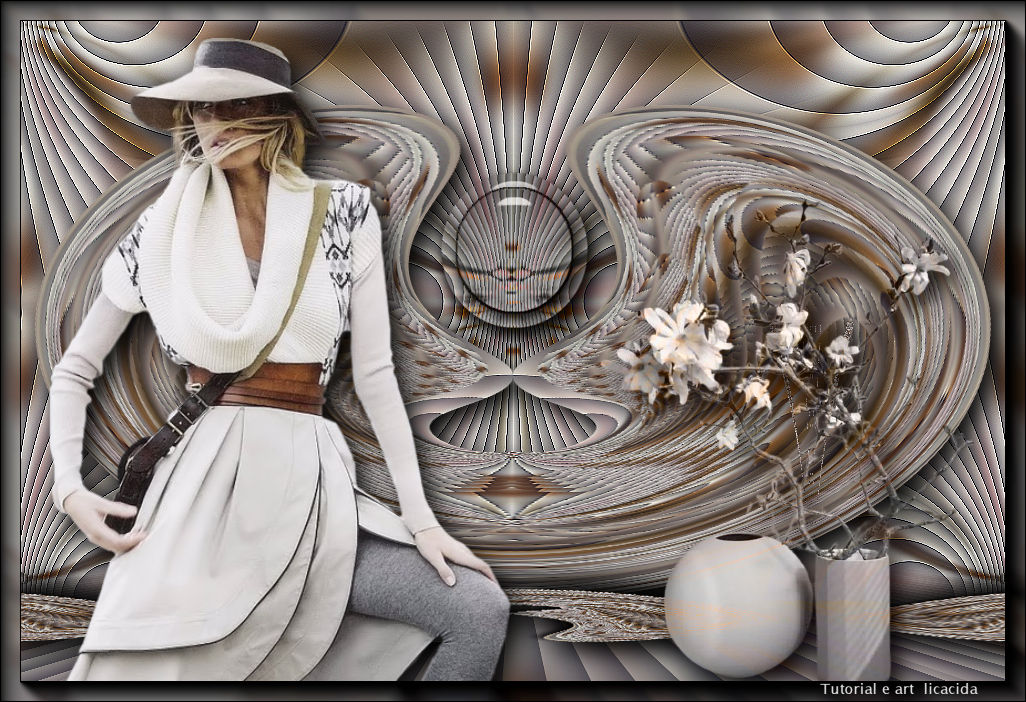
|
"Sweet Magic" 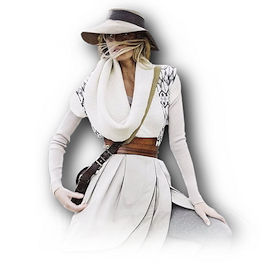
Tubes : VERLAINE C66 Deco:Callitubes-152flores \decocircle_lc
(Agradeço)
Marca D'água .
Efeitos do PSP.
Versão usada PSPX9.
Plugins
Plugins Alien
Skin\ Eye Candy 5 .
Plugins AAA\ Frames
Tutorial
1- Abrir uma nova imagem
transparente de 1024 x 600.
_Preencher com o gradiente
formado pelas cores #aa4858 e #e0e0e0.
Configurar Linear .
Angle 0 \ Repeats 1. Invert desmarcado.
( sua versão
prevalecerá com as cores do seu tube )
2-Selections\Select
All.
_Edit
Copy no VERLAINE C66 ( usar o tube principal
) \ Edit Paste Into Selection . Selections\
Select none.
3-Effects\ Image
Effects\ Seamless Tiling: Default.
4-Adjust \
Blur\ Gaussian Blur... R:18,00.
5-Effects \
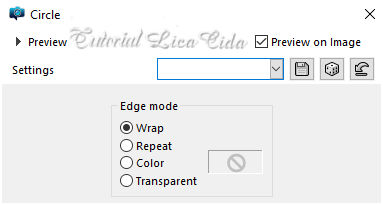
Texture Effects \ Blinds.
Color #000000.

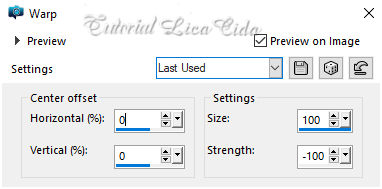
6-Effects\
Distortions Effects\ Warp.
7-Effects \Reflection Effects \ Rotating
Mirror . 0\0 _Reflect.
8-Effects\ Image
Effects\ Seamless Tiling: Default.
_Effects\ Edge Effects\ Enhance.
_Layers Duplicate.
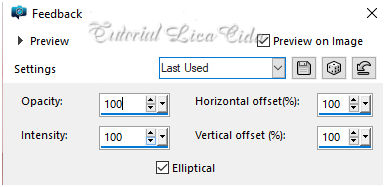
9-Effects
\ Reflection Effect\ Feedback
.
10-Effects \Reflection Effects \ Rotating Mirror .
0\0 _Reflect.
11-Effect\ Distortions Effects\ Polar Coordinates
.
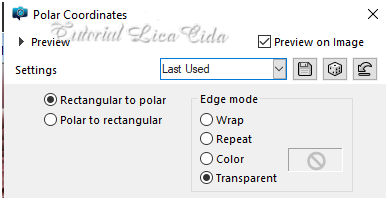
Repetir o efeito mais duas vezes.
*Plugin Alien
Skin Eye Candy 5 : Impact\ Perspective
Shadow_Blurry.
_Layers Duplicate.
12-Effects \ Geometric Effects \ Perspective - Horizontal.
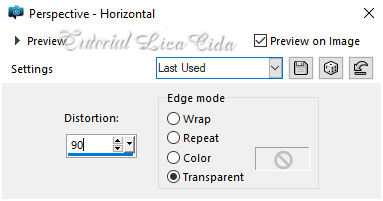 Image Mirror Horizontal. _repetir o í tem 12.
13-Effects \ Geometric Effects \ Circle.
_Adjust \ Sharpness\Sharpen . Image \Mirror Vertical.
*Plugin Alien Skin Eye
Candy 5 : Impact\ Perspective Shadow_Blurry.
14- Ativar a Raster1.
_Layers Duplicate.
_Na copia :
_Image\ Canvas Size _1024 x 700,00
_Bottom 100.
_Adjust \ Blur\ Gaussian Blur...
R:18,00.
15-Effects \ Texture
Effects \ Blinds.
Color #000000.
( print ítem 5)
16-Plugin MuRa's Meister \
Perspective Tiling. Default _Height 20 ( demais
valores iguais).
*Com a Ferramenta Magic Wand \ Feather 60 \ Clique na parte transparente . Deletar ( duas\três vezes _ para suavizar o efeito. ). Selections \ Select none.
_ Adjust \ Sharpness\Sharpen More.
17- Ativar a layer
superior .
_Ferramenta Pick Tool,
posicione: Position X: 0,00 Position Y: 320,00.
18-Opcional ( usar em
todas as layers )
_Plugins AAA Filters\
Custom..._Landscape \Default.
19-Edit Copy no
decocircle_lc \ Paste As New Layer.
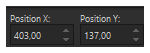
20-Ferramenta
Pick Tool, posicione: Position X: 403,00
Position Y: 137,00.
21-Edit Copy no VERLAINE C66
\ Paste As New Layer.
Posicione.
_
Adjust \ Sharpness\Sharpen.
22-Edit Copy no Callitubes-152flores \ Paste
As New Layer
Posicione.
_Blend mode-
Luminance ( L)
_Image \ Add
Borders \ 1 pxl color =back.
23- Plugins
AAA\ Frames\ Foto Frame.
_Width 20 \
demais valores default.
* Repetir
Aplicar a Marca D'agua.
Assine e salve.
Aparecida \
licacida , março de 2022.
Espero que gostem.
Obrigada!
|