|
"Laura"
Preset Illumination\ Lights_lights \ lights3m _ \
Preset_LightenDarken_ajustarluz ( Guardar em sua pasta
de Presets My PSP Files).
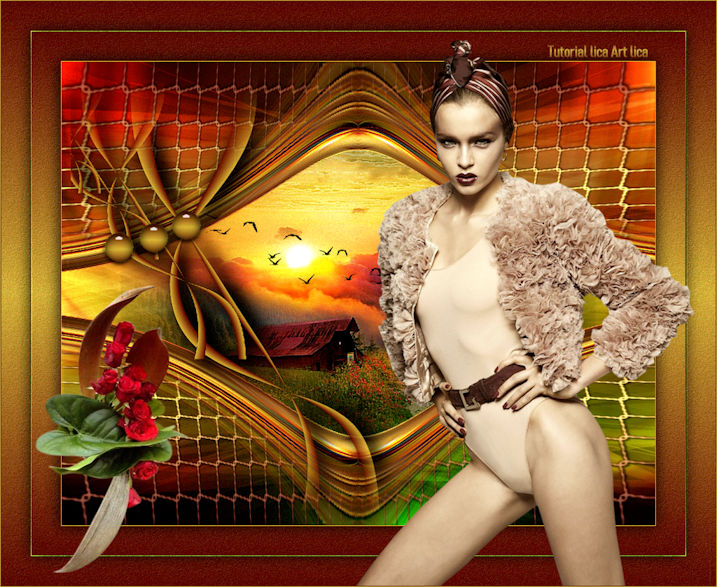
Tubes : verlaine A176\VERLAINE A 112. Callitubes-159flores Brushes :bird_brushes_II_by_lpdragonfly_5. Deco:deco_lc\ deco1_lc. (Agradeço)
Marca D'água .
Efeitos do PSP.
Versão usada PSPX9.
Plugins
Plugin Distort\ Shear.
Plugin MuRa's Meister
Plugin Andromeda
Tutorial
Configurar: foreground #5e0e05 \ background #caab3f
1-Abrir uma nova imagem de 1024 x 800 . Preencher com o gradiente Linear , Angle 0 \ Repeats 1. Invert desmarcado. Formado pelas cores acima.
2-Selections \Select All .Edit
Copy no VERLAINE A 112 \ Edit Paste Into Selection .
Selections\ Select none.
_Effects \ Image Effects \ Seamless Tiling: Default.
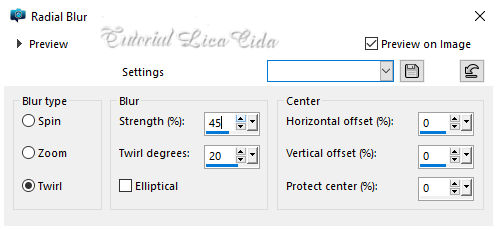
3- Adjust\ Blur\ Radial Blur.
4-Unlimited2
_Layers Duplicate
5-
Effects\ Geometric Effects\ Perspective Horizontal \ 90
_Transparent.
_Image Mirror Horizontal_Repetir.
6-
Image \ Rotate Left.
7-
Effects\ Distortion Effects\ Pinch _S( %) :100.
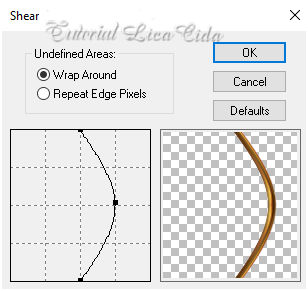
8-
Plugin Distort\ Shear.
9-Image\ Rotate Right.
10-Effects\ Image Effects\ Offset.
0\ -87 ( custom e transparentes marcados).
11-Selecionar a parte inferior do efeito. Use a
ferramenta Magic Wand_Default.
_New Layers.
_ Preencha com o mesmo gradiente formado no ítem1.
12-Plugin Andromeda\ Designs.
13-Plugin Transparency\ Eliminate Black.
Selections \Select none.
_Effects\3D Effects\ Drop Shadow 1\ 1\ 85\ 2,00 .
Color=#000000.
_Copy of Raster1.
_Layers\Arrange\ Move
Up
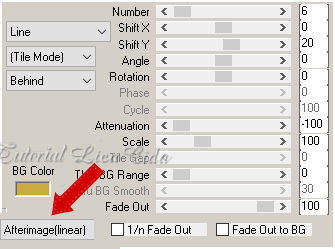
14- Plugin MuRa's Meister\Copies.
_ Effects\Edge Effects\
Enhance More.
Layers Duplicate\Image Mirror Vertical.
Layers\ Merge Down.
_ Raster2.
Layers Duplicate\Image Mirror Vertical.
Layers\ Merge Down.
15-Edit Copy no VERLAINE A 112\Paste As New Layer.
Resize 80%
_Adjust\ Sharpness\ Sharpen More.
(
mirror horizontal_ opcional)
16- Aplicar na raster1.
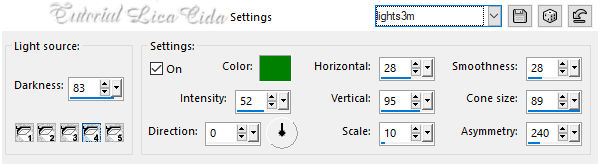
_ Effects\ Illumination Effects\ Preset
Illumination\ Lights\ lights3m.
_Layers
Duplicate
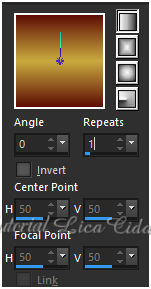
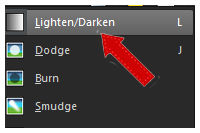
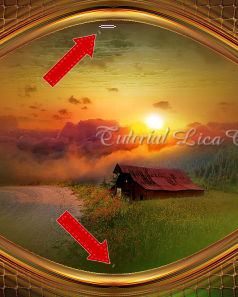
17- Ativar a
ferramenta Lighten\Darken\Selecionar o preset
indicado( segue anexado).
_Desça a ferramenta
até a parte inferior do misted como
mostra o print. ( deixe rodar
)
_Blend Mode
Overley.
18- Ativar a
layer superior__Copy
of Raster1.
_ Effects\ Distortion Effects\ Pinch _S(
%) :100.
_Repetir na
Raster2
19-Edit Copy no
bird_brushes_II_by_lpdragonfly_5\
Paste As New Layer.
Posicione( deverá ficar
acima do misted).
20-Layer superior.
_Edit Copy no
deco1_lc\ Paste As New Layer.
21-Effects\ Image
Effects\ Offset.
-195\ 5 ( custom e
transparentes marcados).
22-Edit Copy no deco_lc\ Paste As New
Layer.
Usar como modelo.
Borders
_Image \ Add Borders \ 1 pxl color
=fore.
_Image \ Add Borders \ 1 pxl color
=back.
_Selections \ Select All. _ Image \ Add Borders \ 50 pxls color =ffffff. Invert. _Preencher com o gradiente formado no ítem 1.
_Adjust\ Add _Remove Noise\ Add
Noise... 10% \ Gaussian\ Mono
marcado.
FMTT\
Blend Emboss. Invert.
_Effects\3D Effects\ Drop Shadow 0\ 0\ 80\ 40,00 . Color=#000000. *Repita os ítens acima.
23-Edit Copy
no verlaine A176\ Paste As New Layer.
Posicione.
24-Edit Copy no Callitubes-159flores\
Paste As New Layer.
Usar a gosto.
*Plugin Alien Skin Eye Candy 5 :
Impact\ Perspective
Shadow_Blurry.
Usar nos efeitos desejados.
Resize _Width 1024 pxls.
Aplicar a Marca D'agua.
Assine e
salve.
Aparecida \
licacida , novembro de 2021.
Espero que gostem.
Obrigada!
|