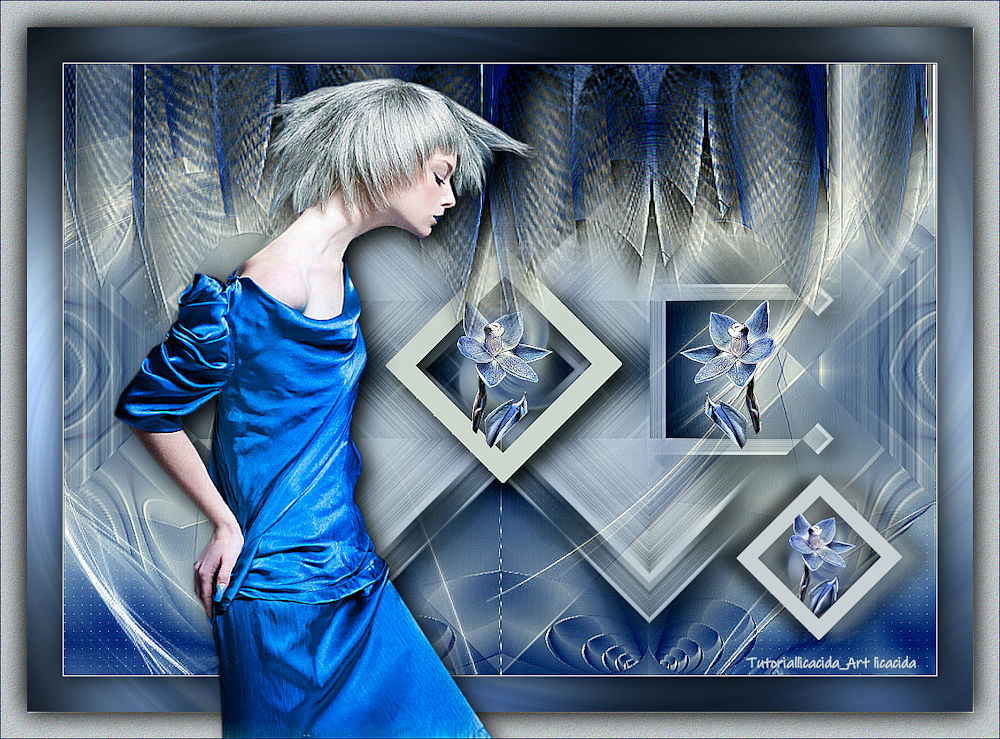
|
"In Blue Fashion Haire"
Seleção: sel_inblue_ lc.PspSelection ( Salve em sua pasta de seleções My PSP Files ) . Tubes : calguisbluefashionhaire12082012\Callitubes-50flores .
Elemento: elementoinblue_01_lc \ elementoinblue_02_lc
Deco:decor_nmcriacoes_112\
decorinblur_lc .
Mask:
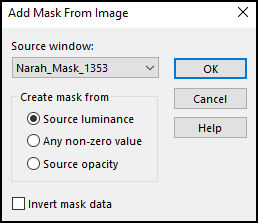
Narah_Mask_1353 .
(Agradeço)
Marca D'água .
Efeitos do PSP.
Versão usada PSPX9.
Plugins
Plugin Simple
Ap 01 {Innovations} Lines
AAA Filters
Tutorial
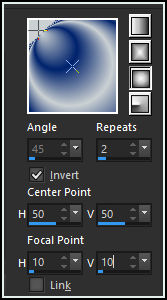
Configurar: foreground #00226c \ background #cbd1d3
1-Abrir uma nova imagem de 1000 x 700 .Preencher com o gradiente formado pelas cores configuradas acima. Sunburst, Repeats 2. Invert marcado.CP=H e V \ 50 _ FP=H e V \10. foreground #00226c \ background #cbd1d3
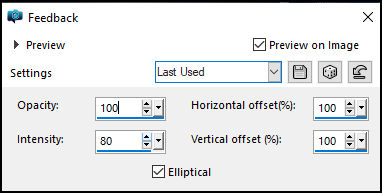
_Effects\ Edge Effects\ Enhance. 2-Effects\ Reflection Effects\ Feedback .
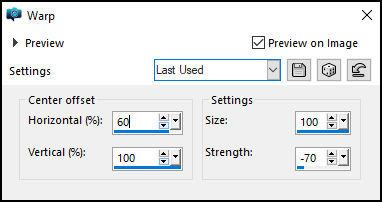
3-Effects\ Distortion Effects\Warp.
4-Edit copy no elementoinblue_01_lc \ Paste As New Layer. 5- Plugin Simple\ 4 Way Average . Emboss3.
6-Edit copy no decor_nmcriacoes_112\ Paste
As New Layer.
( nao esqueça
de apagar a marca dágua, use borracha Size
30)
Opacity 60%.
*Plugin Alien
Skin Eye Candy 5 : Impact\ Perspective
Shadow_Blurry.
7- Selections \Load \ Save Selection \Load Selection From Disk \ Load \sel_inblue1_lc.PspSelection. 8-New Layer\ Preencher com a color do background #cbd1d3.
9-Selections\ Modify\ Contract. 25 _Delete.
10-Edit Copy no decorinblur_lc \
Edit Paste Into Selection .
11-Edit copy no Callitubes-50flores\ Paste As New
Layer.
Reduzir 40%
 (
segue reduzida ) posicione . (
segue reduzida ) posicione .
_Effects\Edge Effects\Enhance . Invert
\Delete.
Selections\ Select none.
Opcional :usar a mesma flor nas as
laterais, fica a gosto ( raster5).
12-Duplicar a raster5 e posicionar a flor do
lado esquerdo com nova layer ( copy of
raster5)
_Effects \Reflection Effects \ Rotating
Mirror . 0\180 _Reflect.
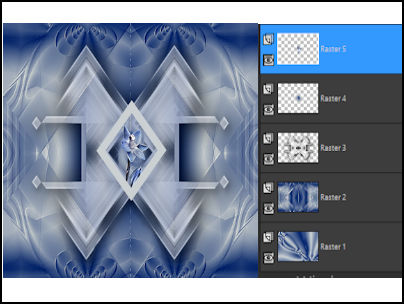
13- Ativar a Raster5.
Layers\Merge Down.
*Plugin
Alien Skin Eye Candy 5 : Impact\
Perspective Shadow_Blurry.
14- Formou a Raster
4\_Layer
duplicate .
Resise 70%
15-Effects\ Image Effects\ Offset.
362\ -215 ( custom e transparentes
marcados).
As layers estão assim:
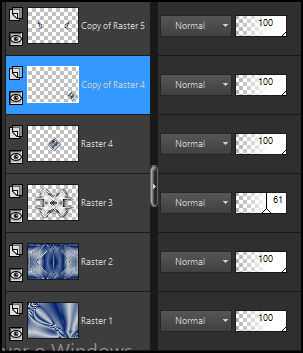
16- Copy of raster
5 ( a superior) _
Layers\Merge Down.(
aplicar duas vezes)
.
17-Raster2_ New Layer
Preencher color #ffffff.
Aplicar a Narah_Mask_1353.
_Effects\Edge Effects\
Enhance.
_Layers\ Merge
Group.
*Plugin \
MuRa's
Seamless \
Emboss at
Alpha _ DEFAULT.
18-Edit
Copy no decorinblur_lc\
Paste As New
Layer.
_Effects\
Image
Effects\
Seamless
Tiling:
Default.
19-Ap 01
{Innovations}
Lines -SilverLining...
 20-Copy no elementoinblue_02_lc \ New Layer. Layers\ Arrange Bring to Top _Adjust \ Sharpness\ Sharpen More.
21-Effects\
Image
Effects\
Offset.
0\ 200 (
custom
e
transparentes
marcados).
_Image \ Add Borders \ 1 pxl color =foreground
22-Effects\
AAA
Filters
_
Custom_Landscape
(defaul).
23-Effects\ AAA Filters _ Custom_Grain (defaul).
_Image \
Add
Borders \ 1
pxl
color
=background
_Image \
Add
Borders \ 1
pxl
color
=foreground
Selections \ Select All. Edit Copy
_Image \ Add Borders \ 40 pxls #ffffff.
Invert\ Edit Paste Into Selection .
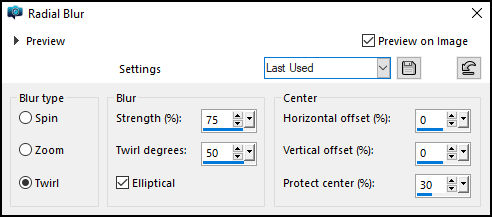
24- Adjust\Blur\ Radial Blur
25-Plugin \ Graphics Plus _Cross Shadow_Default.
Invert
_Effects\3D Effects\ Drop Shadow 0\ 0\ 80\ 40,00 . Color=#000000.
_Selections \ Select All Image \ Add Borders \ 30 pxls color =foreground Invert
26-Adjust\ Add _Remove Noise\ Add Noise... 10% \ Uniform\ Mono marcado.
Plugin FMTT\ Blend Emboss.
Invert
_Effects\3D Effects\ Drop Shadow 0\ 0\ 80\ 40,00 . Color=#000000. Selections\ Select none.
.Image \ Add Borders \ 1 pxl color =#foreground.
Resize _Width 1000 pxls.
Aplicar a Marca D'agua.
Assine e salve.
Aparecida \ licacida , outubro de 2021.
Espero que gostem.
Obrigada!
|