|
"Good Time"
Material Aqui
Seleção: selbtempo_1_lc.PspSelection.
( Salve em sua pasta de seleções My PSP Files ) .
Tubes : Femme 752 by Lily \Paysage hiver misted jewel 020.
Deco:ildiko@create0006_deco \elementobtempo_1_lc \elementobtempo_2_lc.
Masks:Narah_mask_0793\Du_difuminadaLateralDe_Dushi.
(Agradeço)
Marca D'água .
Efeitos do PSP.
Versão usada PSPX9.
Plugins
Plugin dsb flux
Plugin Mehdi
Plugin Simple
Tutorial _Roteiro
1-Abrir uma nova imagem de 1000 x 700 .
Preencher com o gradiente formado pelas cores #0a1926 ( usar no
foreground ) e #8aa6b2( usar no background) .
Configurar Linear . Angle 45 e Repeats 3. Invert marcado.
2-Selections \Select All .Edit Copy no Paysage hiver misted jewel
020. \ Edit Paste Into Selection .
Selections\ Select none.
_Adjust\ Blur\ Gaussian Blur. R:26,00
3-Plugin Mehdi \Sorting Tiles.
_Effects\ Edge Effects\ Enhance.
_Layers Duplicate.
4- Effects\ Geometric Effects\ Perspective-Horizontal... D: 55 \
Transparent.
_View Rulers \ Traga o efeito a 500 pxls _ use a ferramenta Pick
Tool.
Desabilite a régua.
5- Selecionar a parte externa do efeito com a ferramenta Magic Wand
_Default.
Invert
6-Edit Copy no Paysage hiver misted jewel 020. \ Edit Paste Into
Selection .
Adjust\ Sharpness\ Sharpen More
7-Effects\ 3DEffects\ Chisel.
(cor escura\ foreground)
Size:6 \ Transparent.
Selections \Select none.
*Plugin Alien Skin Eye Candy 5 : Impact\ Perspective Shadow_Blurry.
8- Raster1 . Layers Duplicate.
( *Tirar a visibilidade da raster1 )
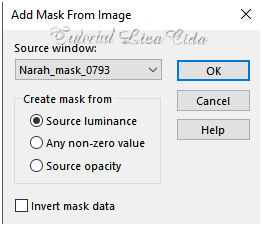
Aplicar a Narah_mask_0793.
Effects\ Edge Effects\ Enhance.
Layer\Merge \Group.
_Plugin \ MuRa'Seamless\ Emboss at Alpha_Default.
9-Effects\ Image Effects\ Offset.
170\0 ( custom e transparentes marcados).
10-Selections \Load \ Save Selection \Load Selection From Disk \
Load \selbtempo_1_lc.PspSelection.
11-Edit Copy no Paysage hiver misted jewel 020. \ Edit Paste Into
Selection .
Adjust\ Sharpness\ Sharpen More .
12-Effects\ 3DEffects\ Chisel.
(cor escura\ foreground)
Size:6 \ Transparent.
Selections \Select none.
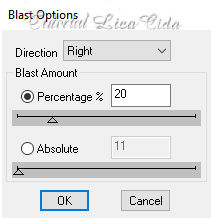
13-Plugin dsb flux\ Blast.
*Plugin Alien Skin Eye Candy 5 : Impact\ Perspective Shadow_Blurry.
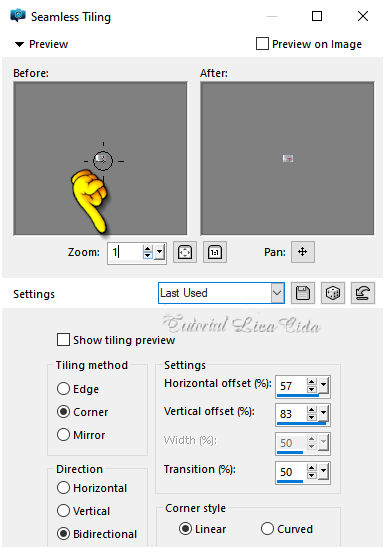
14-Effects\ Image Effects\ Seamless Tiling:
(*Ativar a visibilidade da raster1).
15- Ferramenta Pen Tool_Styled Lines : +Solid.
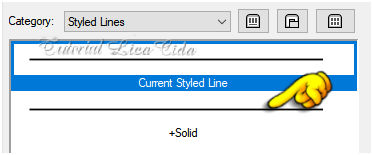
_Configurar:

_New Layer
*Mude o foreground para a cor clara .Transparent o background.
*Faça dois traços como o modelo.
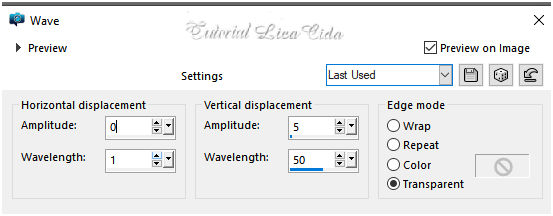
16-Effects\ Distortion Effects\ Wave.
_Layers Duplicate\ Image Mirror Vertical.
_Image Mirror Horizontal.
_Layers\Merge\ Merge Down.
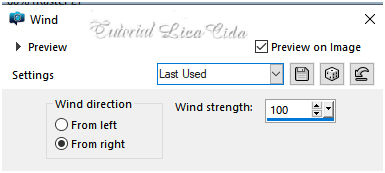
17-Effects\ Distortion Effects\Wind.
Blend Mode Screen.
18-Usar abaixo da Raster2.
_Edit Copy no elementobtempo_1_lc\ Paste As New Layer.
_Objects\ Align\ Right. Blend Mode Luminance (L).
19-Edit Copy no elementobtempo_2_lc\ Paste As New Layer.
_Objects\ Align\ Right. Blend Mode Screen.
Layers\ blends\opacitys
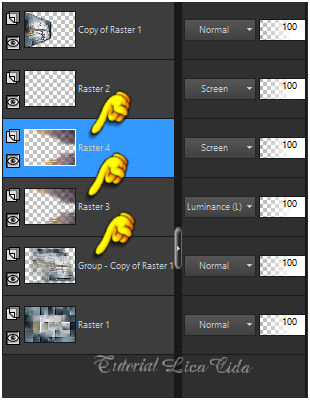
Observe as layers indicadas e aplique:
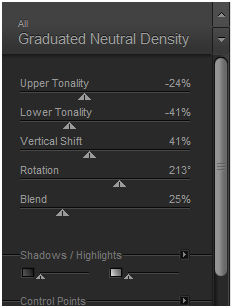
20-Plugin Nick Software\ Color EfexPro 3.0\Graduated Neutral Density.
20- Raster1-
Plugin Graphics Plus\ Cross Shadow_Default.
* Normalize o foreground e o background como no ítem 1.
21-Image \ Add Borders \ 1 pxl color =foreground.
Image \ Add Borders \ 2 pxls color = background.
Image \ Add Borders \ 1 pxl color = foreground.
22-Image \ Add Borders \ 50 pxls color = ffffff.
Selecione\ New Layer
Preencha com o grad formado no ítem 1.
23-Plugin Graphics Plus\ Cross Shadow_Defaul.
24-Selections \Select All.
_Selections \Modify \Contract... 25pxls.
_Effects\3D Effects\ Drop Shadow 0\ 0\ 80\ 40,00 . Color=#000000.
Selections \Select none.
25-Edit Copy no Femme 752 by Lily\ Paste As New Layer.
Posicione.
_Aplicar a mask : Du_difuminadaLateralDe_Dushi. ( acertar a lateral
da saia )
Layer\Merge \Group.
26-Edit Copy no ildiko@create0006_deco\ Paste As New Layer.
Posicione como modelo ao lado esquerdo da tag. Blend Mode Luminance(L).
Plugin Simple \ Top Left Mirror
Layers Duplicate\ Resize 90%
_Image \ Add Borders \ 1 pxl color =foreground.
Resize _Width 1000 pxls.
Aplicar a Marca D'agua.
Assine e salve.
Aparecida \ licacida , fevereiro de 2021.
4
Espero que gostem.
Obrigada!

:::...VOLTAR...:::
|
