|
|
|
"Mariana"
Preset
Illumination\Lights_lights \ lc14 mp ( Guardar em sua pasta
de Presets My PSP Files).
Tubes
: 3113 - woman - LB TUBES \nicole-paysage2-2020.
3252 -
still life - LB TUBES.
Mask: 079tchrist.
Elementos: elementomariana\ elemento1mariana\
elemento2mariana_mp
(Agradeço)
Marca
D'água . Efeitos do PSP.
Versão
usada PSPX9
Plugins
FFG \
M.
FFG\
G.
_Plugin Eye Candy 5
Impact.
Plugin MuRa's Meister.
Tutorial _Roteiro
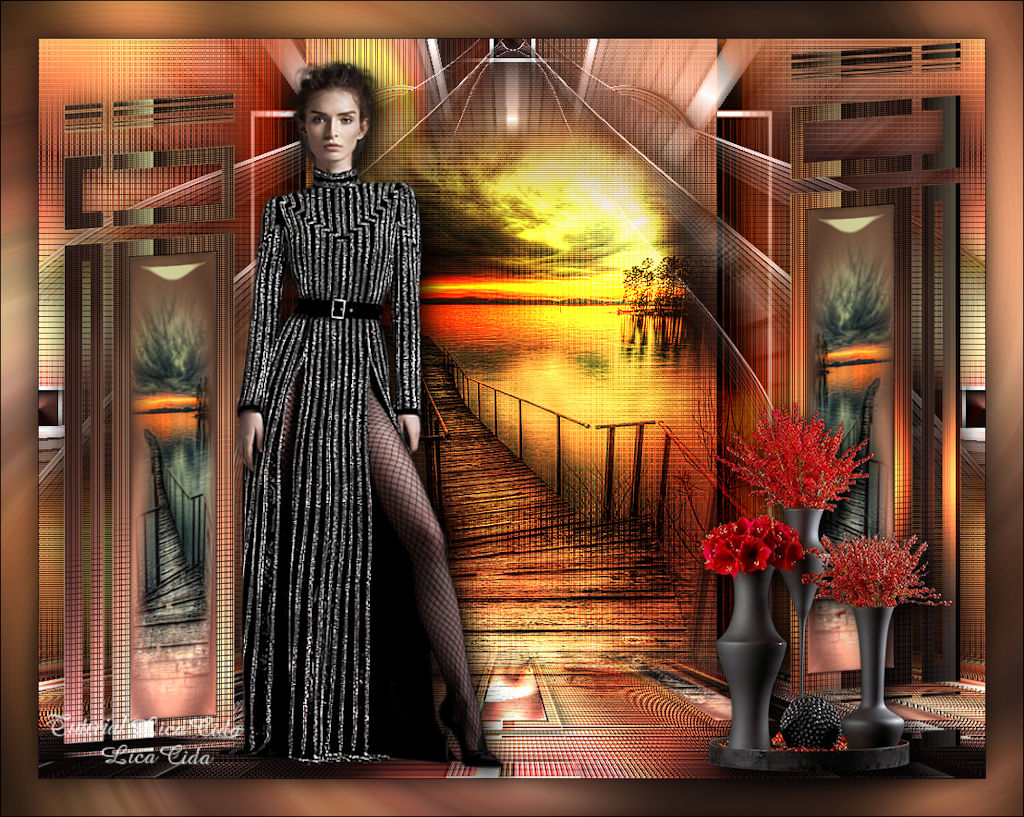
1-Abrir nova imagem transparente de 1024 x 800.
Preencher com o
gradiente formado pelas cores #1f0f14 ( usar no foreground
) e #cb938e ( usar no
background) Configurar Rectangular . Angle0 \ Repeats
2. Invert marcado.CP=H eV, 50 \ FP=H eV, 50.
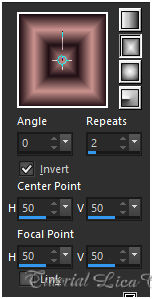 2- Plugin FFG \ M _Loom...Default.
 _Layers Duplicate.
*Tirar a visibilidade da
Raster1.
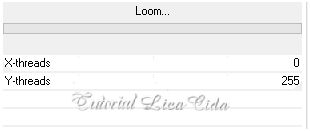
3-Aplicar a mask 079tchrist.
 Layers\ Merge Group.
_Effects
\Reflection Effects \ Rotating
Mirror .
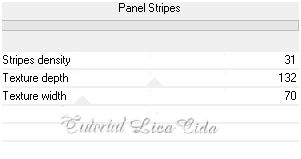
0\0_Reflect. 4- FFG\ G _Panel Stripes_Default.
 _Com a Ferramenta Magic Wand _ Default , selecionar
a parte externa dos efeitos.
Invert.
5-Selections \Modify \Contract... 20pxls.
Delete. Selections\ Select none.
*Selecionar o primeiro retângulo.
( com a Ferramenta Magic Wand _
Default)
6- New layer ( raster2)
_ preencher com o gradiente formado no
ítem1.
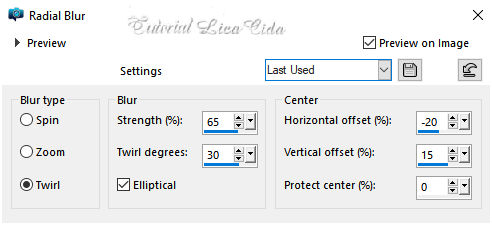
_ Adjust \ Blur\ Radial
Blur.
 _Edit Copy no
nicole-paysage2-2020 \ Edit Paste Into Selection .
_Adjust\ Sharpness\ Sharpen
More.
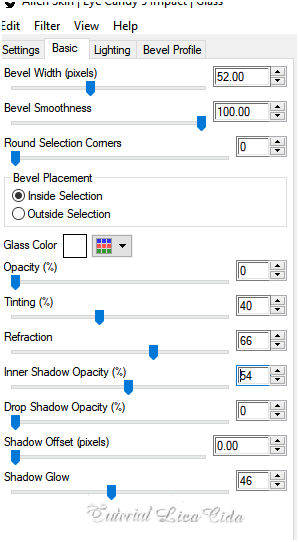
_Plugin Eye Candy
5 Impact \ Glass .
Basic
 _Effects \ 3D Effects\
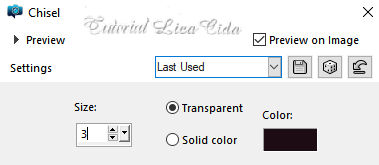
Chisel.
( color foreground
)
 _Selections\ Select
none.
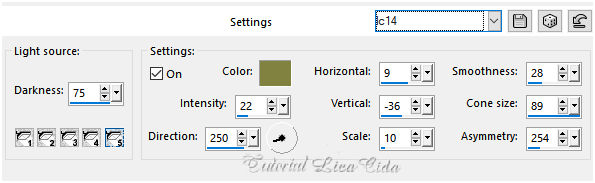
7-Effects\ Illumination Effects\ Preset
Illumination\ Lights\ lc14.
 _Layers Duplicate. Image \ Mirror
Horizontal.
_Layers\ Merge Down.
8- Layer da
mask.
Effects\ Illumination Effects\ Preset
Illumination\ Lights\ lc14.
( print acima)
* Selecionar o segundo
retângulo.
( com a Ferramenta Magic Wand _
Default)
9- Raster 2
.
_Preencher com o
gradiente formado no ítem1.
_ Adjust \ Blur\ Radial
Blur.
( print acima)
_Adjust\ Sharpness\
Sharpen
More.
_Plugin Eye
Candy 5 Impact \ Glass .
Basic ( print acima
)
_Effects \ 3D Effects\ Chisel_
color foreground. ( print
acima)
Effects\ Illumination Effects\ Preset Illumination\
Lights\ lc14.
( print
acima)
_Selections\ Select
none.
_Layers\ Merge
Down. _Effects\3D Effects\ Drop Shadow.0\ 0\ 80\
40,00 . (Color=#000000).
*Abrir a visibilidade da
Raster1.
10- Ativar a
layer.
_Effects\ Illumination Effects\ Preset
Illumination\ Lights\ lc14.
( print ítem 7)
11- Layer
superior.
Edit \ Copy Special \ Copy
Merged . Edit Paste a New Layer .
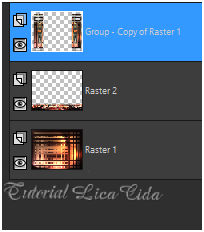
12- Plugin MuRa's Meister \ Perspective Tiling . Height 20. _Layers\ Arrange Move Down. *Com a Ferramenta Magic Wand \ Feather 60 \ Clique na parte transparente . Deletar ( tres\quatro vezes ). Selections \ Select none. _ Emboss313- Layer da mask. Group-Copy of Raster1.
Com a borracha Size 200, apagar o retangulo central.
As layers estão assim.
 Continuando...
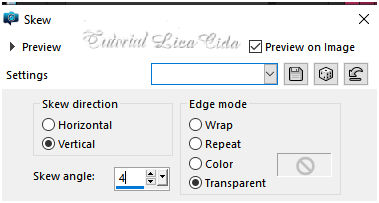
14-Effects\ Geometric Effects\ Skew.
 15-Edit Copy no nicole-paysage2-2020 \
Paste As New Layer.
_Effects\ Illumination Effects\ Preset
Illumination\ Lights\ lc14. ( opcional )
( print ítem 7)
Blend Mode\ Hard Light. ( Opacity a
gosto ).
_Adjust\ Sharpness\
Sharpen
More.
16-Edit Copy no elemento2mariana
\ Paste As New Layer.
Layers\ Arrange Move Down ( aplicar tres
vezes )
17-Edit Copy no elemento1mariana
\ Paste As New Layer.
Objects\ Align
\Top.
_Adjust\ Sharpness\
Sharpen
More.
18-Usar no foreground a
cor #fbf7b5, ativar a Ferramenta
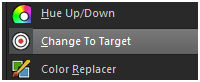 Change To Target , Change To Target ,
configurar: como
print.
*Pincelar o elemento1 a
gosto.
 19-Edit Copy no elementomariana \
Paste As New Layer.
Objects\ Align
\Top.
_Adjust\ Sharpness\
Sharpen
More.
20-Raster1.
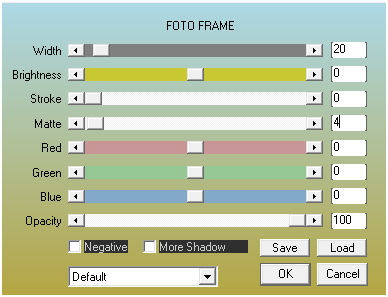
Plugin AAAFrames \ Foto
Frame.
_ Effects \ Image
Effects\ Seamless Tiling _ Default
.
Layers\
Blends\
Opacitys.
 21-Edity Copy \ Raster 1. _Image \ Add Borders \ 1 pxl color = foreground (#1f0f14) . Selections \ Select All _Image \ Add Borders \ 40 pxls color = background . Invert Edit Paste Into Selection \ a imagem copiada. _ Adjust \ Blur\ Radial Blur. ( print acima ) Plugin Graphics Plus\ Cross Shadow_Default. Invert. _Effects\3D Effects\ Drop Shadow.0\ 0\ 80\
40,00 . (Color=#000000). Selections \ Select
none.
22-Edit Copy no
3113 - woman - LB TUBES\ Paste As New Layer.
Posicione e use a
gosto.
23-Edit Copy no 3252
- still life - LB TUBES\ Paste As New Layer.
Posicione e use a
gosto. _Image \ Add Borders \ 1 pxl color = foreground (#1f0f14) . * Resize \ Width 1024 pxls. Aplicar
a Marca D'agua.
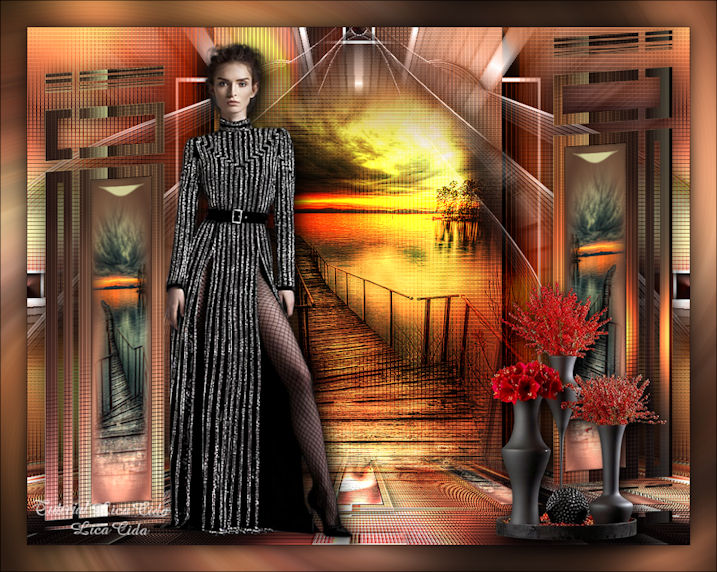
Assine
e salve. Aparecida \ licacida , novembro de
2020.
25
Espero que gostem.
Obrigada!
  |