|
|
|
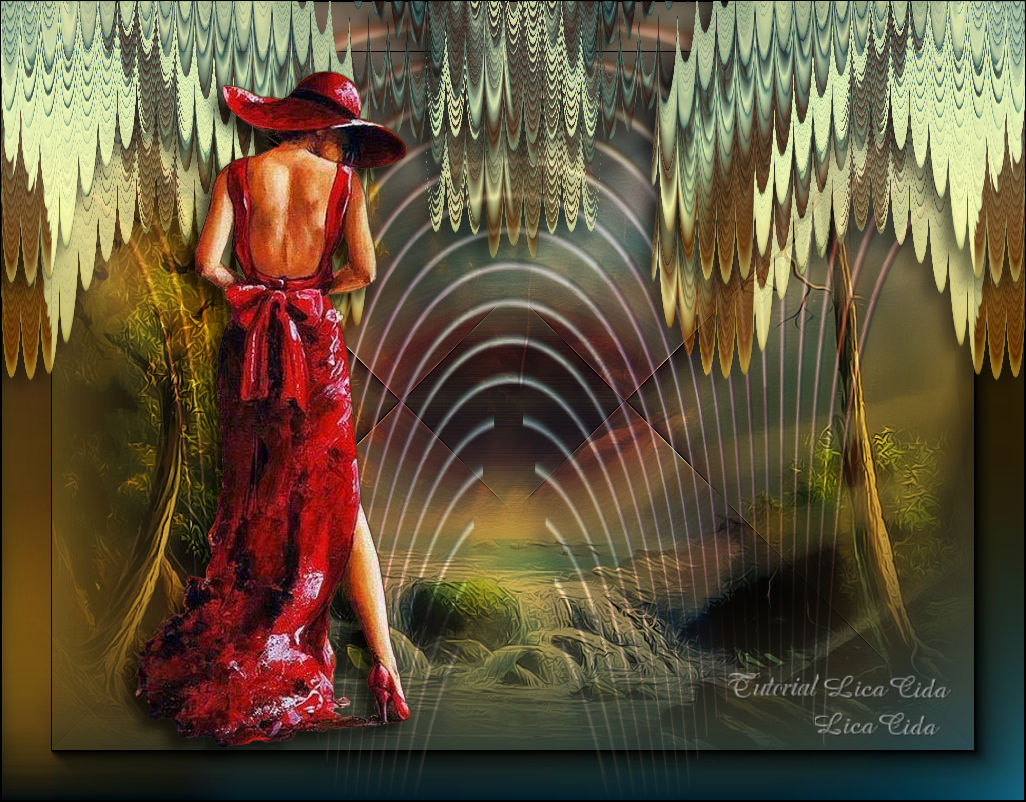
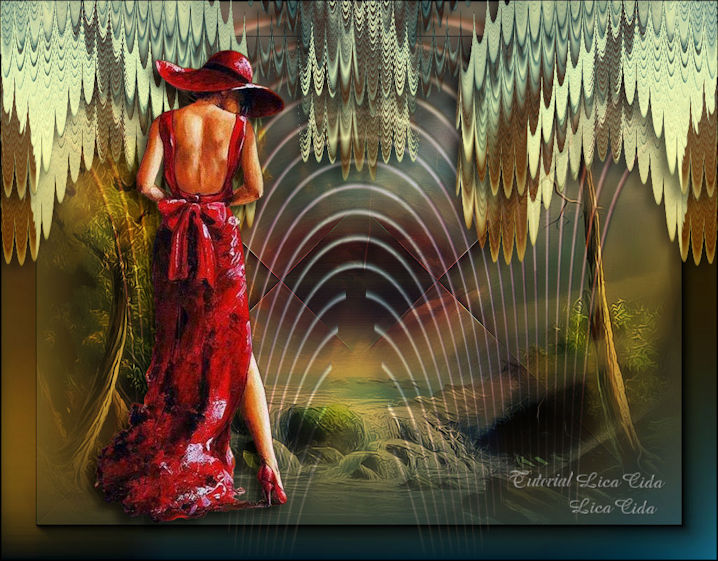
"Tranquility"
Efeito inicial
_efeitolcanexado
Preset
Illumination\Lights_lagata(marapontes) ( Guardar em sua pasta
de Presets My PSP Files). Tube:
Jen_Vrouw 934_ 1-12-2018 \CAL-2691-050118©Wendell Well.
Back:backlcfinal
Mask:002 gradientedworisch
(Agradeço)
Marca
D'água . Efeitos do PSP.
Versão usada PSPX8.
Plugins
Plugin MuR'as Seamless
Plugin
Simple
Plugin
MuRa's Meister Tutorial _Roteiro
1-Abrir a nova imagem _o efeito anexado nos
materiais. Delete a raster2.
Duplicar esta layer.
( a quem interessar...)
O efeito na íntegra se encontra na página do meu
site:
Paramos no ítem 8, onde iniciaremos este tutorial
"Tranquility".
2-Plugin MuR'as
Seamless\ Shift at Arch.
 * Layer\ Arrange\ Move
Dow.
3-Ativar a layer superior (
raster1) .
Repetir Plugin MuR'as Seamless\ Shift at
Arch.
( print ítem 2)
_Effects /
Image effects /Offset: H= 0 \ V= 95. Custom e Transparent
marcados.
_Effects / 3D effects / Drop Shadow:
10/ -10/ 70 / 20,00 . Color=#000000.
_Aplicar nas duas layers.
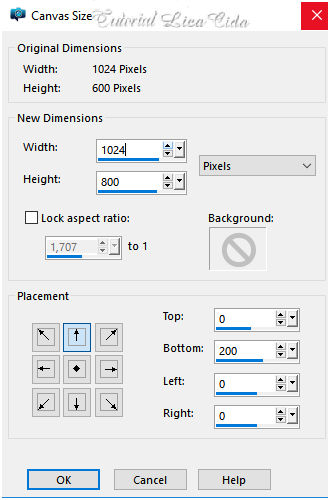
4-Canvas
Size 1024 x 800 _ Bottom 200.
 5- Nova
layer\Send to Bottom.
Preencher
com
o
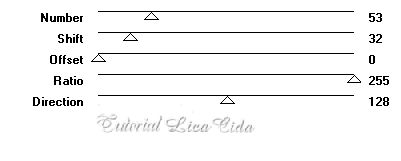
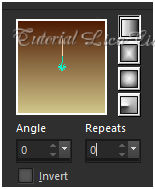
gradiente formado pelas cores #d1c589 \ #4d1b04.
Configurar Linear . Angle 0\ Repeats 0. Invert
desmarcado.
 6-Select All. Edit Copy no tube Jen_Vrouw
934_ 1-12-2018 \ Edit Paste Into Selection . Selections\ Select
none.
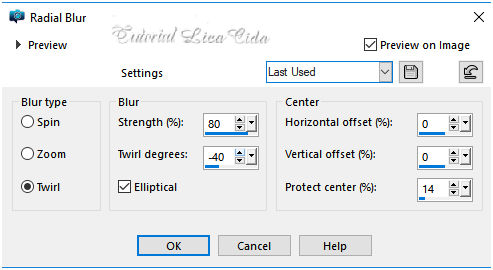
7-Adjust\ Blur\ Radial Blur.
 8-Plugin Simple \ Pizza Slice Mirror.
9-Plugin Simple \ Top Left Mirror.
Effects\ Edge Effects\ Enhance More.
Duplicar esta layer.
10-
Effects\ Geometric Effects\ Perspective Horizontal.
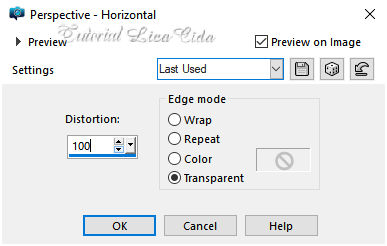 Image
Mirror Horizontal.
11-
Repetir: Effects\ Geometric Effects\ Perspective Horizontal.
( print ítem 10).
12-Effects\ 3D Effects\ Inner Bevel.
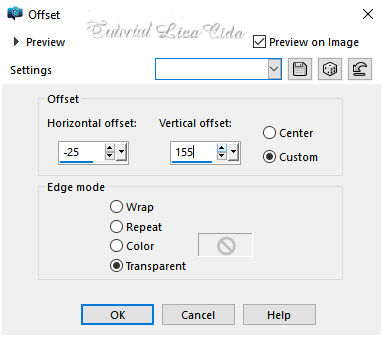
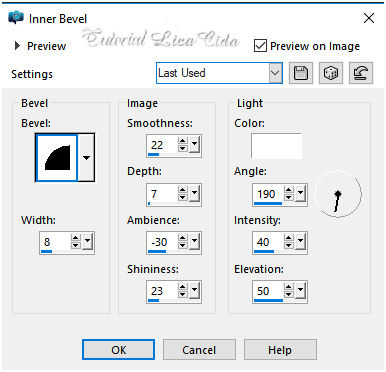 13-
Effects\ Image Effects\ Offset.
 14-Plugin MuRa's Meister
\Copies_
Throw
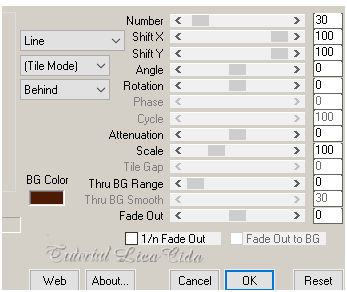 Image Mirror Vertical
\Layer Duplicate\ Image Mirror
Horizontal.
Layer\ Merge\ Merge
Down.
Image Mirror Vertical
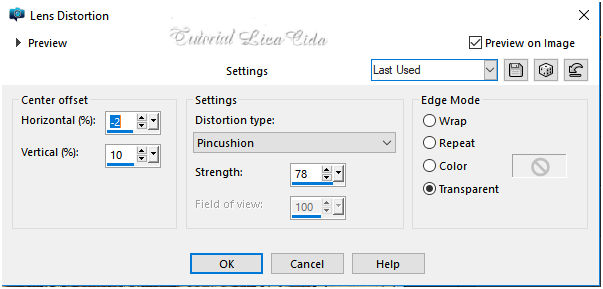
15 -Effects\Distortion
Effects\ Lens
Distortion.
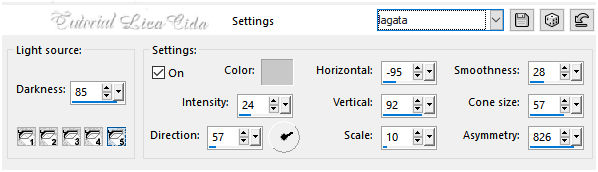
 16- Ativar a
layer inferior_Raster2.
Effects\
Illumination Effects\ Preset Illumination\ Lights\ lagata.
 17-Aplicar a mask 002
gradientedworisch.
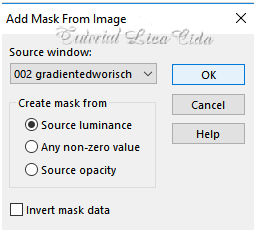 Layer \ Merge Group.
Layer Duplicate
18-Plugin Nick Software\ Color EfexPro
3.0\ Bi -Color Filters .
Cool Warm -1.
*Repetir nas duas primeiras layers o Cool Warm -1.(
raster1 e sua cópia).
19-Nova Layer\Send to Bottom.
Select All. Edit
Copy no backfinallc \ Edit Paste Into Selection .
Selections\ Select none.
( use a cor que combine com seu trabalho ).
20- Ativar a layer Copy of
Raster2
Effects\Distortion
Effects\ Polar
Coordinates.
 *Layer \ Merge\ Merge Down.
BM=Screen.
*Aplicar a mask 002 gradientedworisch. Layer \ Merge
Group.
( print ítem 12)
21-Edit Copy no CAL-2691-050118©Wendell Well\ Paste As
New Layer.
Descer um pouco o misted. BM=Overley.
Layers\ Blends\ Opacitys.
Use a gosto
 22- Aplicar o Plugin AAA Frames \ Foto
Frame...Width 50_Demais valores Default.
nas tres ultimas layers.
23-Ativar a Layer superior, Raster1.
Edit Copy no Jen_Vrouw 934_ 1-12-2018\ Paste As New
Layer.Posicione.
_Effects / 3D effects / Drop Shadow:
10/ -10/ 70 / 20,00 . Color=#000000.
Opcional * Image \ Add
Borders \ 1 pxl color
=#000000. Aplicar a Marca D'agua.
Assine e
salve. Aparecida \ licacida , dezembro de
2018.
Espero que gostem.
Obrigada!
  |