|
|
|
"Eva"
Preset katrina _mp \ do Eye Candy
5/Impact/Glass.
(Dar duplo clic sobre o preset para importar-lo
ao Plugin). Preset Illumination\Lights_lights6 \ lc (
Guardar em sua pasta de Presets My PSP
Files). Tubes:
5139-luzcristina \ Drevers_misted_landscape_11.
Deco
:Drevers_deco_25 \ ildiko@create0006_deco \
Ildiko_create_deco (139).
Imagem: backinicial \ BACK6-RB.
(Agradeço)
Marca
D'água . Efeitos do PSP.
Versão usada PSPX8.
Plugins
Plugin
Graphics Plus
Plugin Mehdi
Plugin
It@lian Editors Effect
Plugin
MuRa's Meister
Plugin
Nick Software
Tutorial _Roteiro
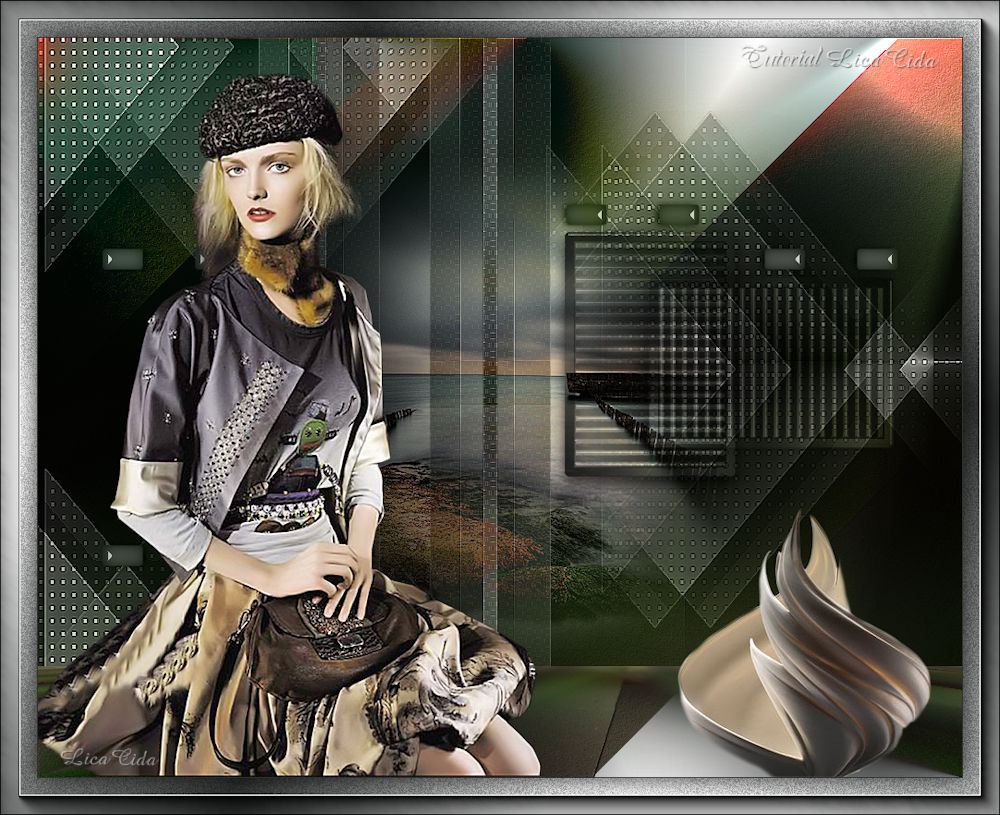
1-Abrir o backinicial anexado , ou abrir uma nova imagem transparente de 1000 x 700
.Preencher com
o
gradiente formado pelas cores que você escolher. Configurar Linear , Angle e Repeats 0. Invert marcado.
( usei o
back do misted ) Abrirá a Layer Background. Renomear
Raster1. 2-Nova
Layer. Renomear Raster2.
Select
All. Edit Copy no Drevers_misted_landscape_11 \ Edit Paste
Into Selection . Selections\ Select none.
Blend Mode=Soft Light.
Layer\
Merge\ Merge Dow. ( Ficaremos então com a layer Raster1)
.
3-Plugin Graphics Plus \ Vertical Mirror _Default ( 128\
0 ) .
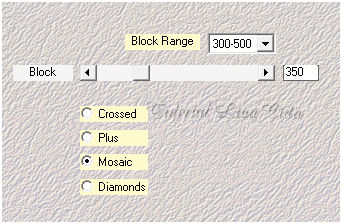
4-Plugin Mehdi \ Sorting Tiles.
 Effects \Reflection Effects \ Rotating
Mirror . H = 0 \ R= 0 \ Repeat.
Effects\ Edge Effects\ Enhance.
5-Nova
Layer. Renomear Raster2.
Select
All. Edit Copy no Ildiko_create_deco (139) \ Edit Paste
Into Selection . Selections\ Select none.
*Com a ferramenta Pick Tool _Default ( acertar a
lateral esquerda ).
6- Plugin It@lian Editors
Effect\ Effectto Fantasma . S-X=15 \ S-Y=0.
Effects\ Edge Effects\ Enhance. Blend
Mode=Luminance (L).
7-Ativar a Raster1.
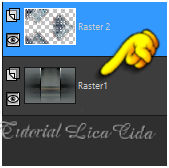 Seleção Personalizada ( tecleS).
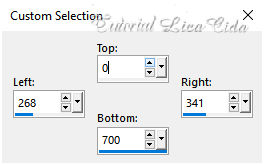 Promote Selection to Layer.
Selections\ Select none.
Layer\ Arrage\ Move Up.
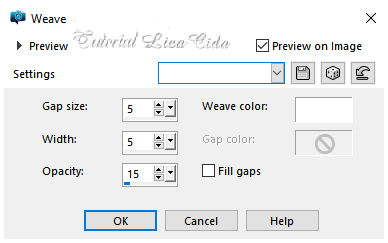
8- Effects\ Texture Effects\
Weave.
 8- Plugin It@lian Editors Effect\ Effectto Fantasma
.S- X=15 \ S-Y=0.
Effects\ Edge Effects\ Enhance.
Layer Duplicate.
9- Effects\ Image Effects\
Offset . H= 185 \ V=0 . Custom e
Transp.
Layer\ Merge\ Merge Dow. Blend
Mode=Luminance (L).
10-Image\ Canvas Size : 1000 x
800. Bottom100.
11-Nova layer\ Send to Bottom.
Renomear
Raster3.
Escolher uma cor escura usada no
seu gradiente inicial ( usei =#2f3231 ). Usa-la no
backgraund.
No foregraund usar cor
#ffffff.
Preencher com o
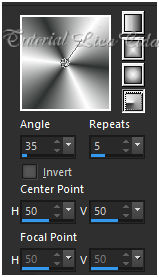
gradiente formado pelas cores acima e configurar:
Radial Angle=35 e
Repeats =5.Invert desmarcado. CP=H e V=50.
 12- Nova Layer. Renomear
Raster4.
Select All. Edit
Copy no BACK6_RB \ Edit Paste Into Selection . Selections\
Select none.
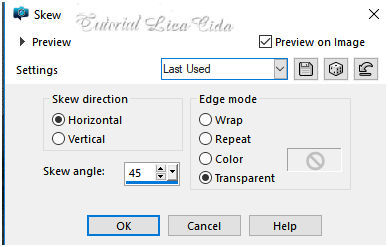
13- Effects\ Geometric Effects\
Skew.
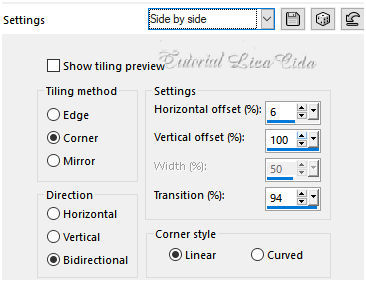
 14-Effects\ Image Effects\ Seamless Tiling: Side by
side.
 Adjust\ Add/ Remove Noise \ JPEG
Artifactal Removal... ( Maximum\ C=80) .
Plugin FMTT\ Blend
Emboss.
Layer Duplicate. 15-Plugin MuRa's Meister \Perspective Tiling.
Effects\3D Effects\ Drop Shadow. 1\ 1\ 100\
1,00 . (Color=#000000).
Layer\ Arrange\ Bring to
Top. 16-Aplicar na raster1.
Effects\ Illumination Effects\ Preset
Illumination\ Lights\ lightlc6
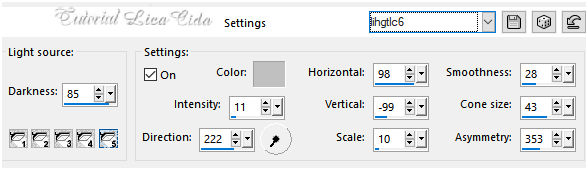 17-Ainda na raster1...
Plugin Nick Software\ Color EfexPro
3.0\ Bi-Color Filters.
Color Set\ Moss3.
 Blend Mode=Overley.
layers\ blends\ opacitys
use a gosto
 18-Ativar a raster2.
Edit
Copy no Drevers_misted_landscape_11\ Paste As New Layer.
Resize 90%
Adjust\ Sharpness\ Sharpen More.
Adjust\ One Step Photo Fix .
Layer Merge Visible.
19-Seleção Personalizada (
tecleS).
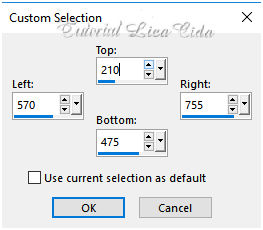 Nova Layer.
Preencher com o gradiente Radial formado no ítem
11.
_Adjust \ Blur\ Gaussian Blur: R=
38,00.
20- Selections\ Modify \ Contract 12
pxls.
21- Effects \Reflection
Effects\ Pattern.
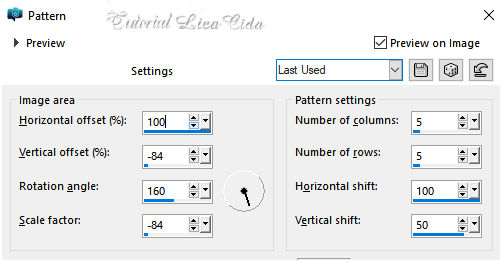 Selections\
Select
none.
23-Plugin Alien Skin Eye Candy 5: Impact\
Glass...Setting\ use Setting\ katrina
. 24-Plugin Alien
Skin Eye Candy 5 : Impact\ Perspective
Shadow_Blurry.
Blend Mode=
Multiply.
Layer\
Duplicate
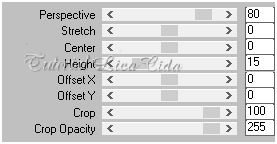
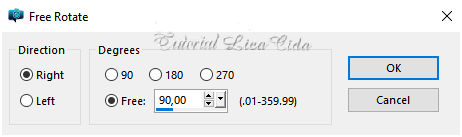
25-Image\ Free
Rotate.
 Blend Mode= Soft
Ligth.
26-Edit Copy no ildiko@create0006_deco \
Paste As New
Layer.
( o usado esta
selecionado) Blend Mode=
Luminance
(L).
Use como tutorial ou a
gosto.
27-Edit Copy no tube 5139-luzcristina\ Paste As New
Layer.
Adjust\ Sharpness\ Sharpen
More.
*Plugin Alien Skin Eye Candy 5 :
Impact\ Perspective
Shadow_Blurry.
( em basic use opacity
70%
).
28-Edit Copy no
Drevers_deco_25\ Paste As New
Layer.
Adjust\ Sharpness\ Sharpen
.
*Plugin Alien Skin Eye Candy 5 :
Impact\ Perspective
Shadow_Blurry.
( em basic use opacity
70%
).
29-Image
add borderes 1 pxl \ cor mais escura (#2f3231
).
Image add borderes 40 pxls \ cor mais clara
(#ffffff).
Selecione . Preencha com o
gradiente formado
acima.
30-Plugin dsb flux\ Bright Noise...
Intensity45 \
Mix.
Invert.
Effects \ 3D
Effects \ Drop Shadow 0\ 0\
80\ 40,00. Color=000000.
Selections\ Select
none. 31-Plugin \ AAA Frames .
 Resize \ Width 1000
pxls.
Aplicar a Marca D'agua.
Assine e
salve. Aparecida \licacida \ novembro de
2019.
Espero que gostem.
Obrigada!! |

