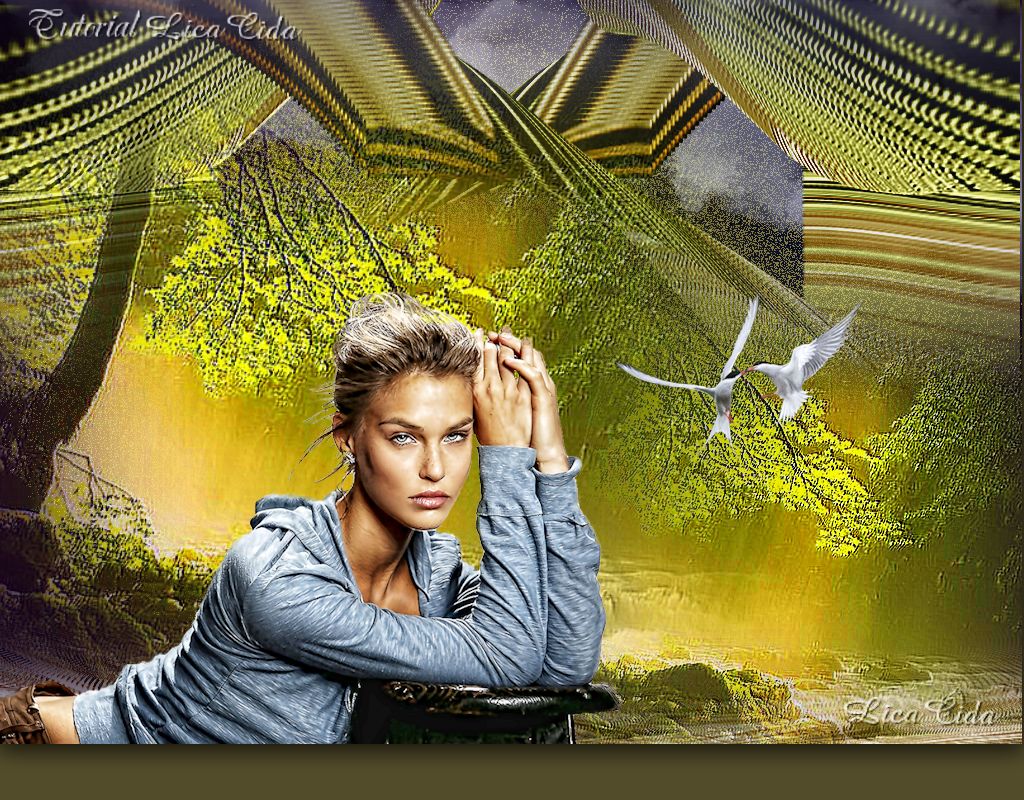
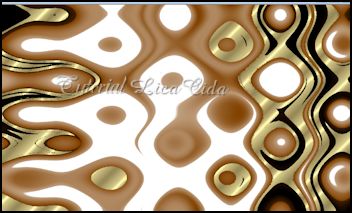
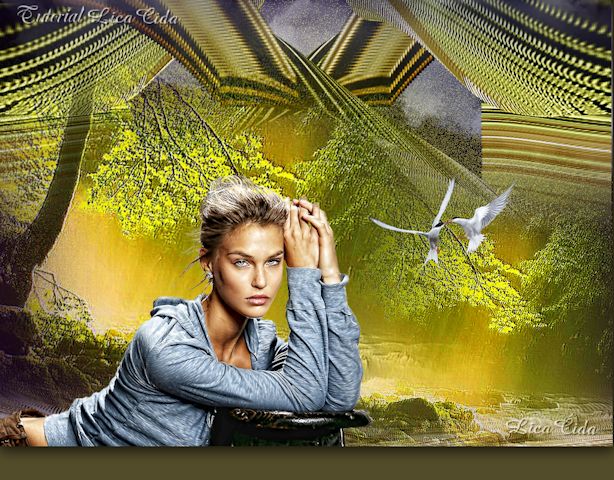
" Top Amanhã"
Material
Script : nuvens mara10( salve em sua pasta de Scripts Restricted de
My PSP File). Obrigada Mara amiga !
Tubes: 3029-luzcristina\
pspcybertubes2012-190
Pattern gold (22).
Gradiente: cg-eye-2
Background_backamanhã
lc1.
Masks: Mask 20-20 \Mask Gradiente\ mask.ket
-fadesuave
Marca D'água.
Efeitos do PSP.
Versão usada PSPX5
Plugins
Plugin VM Distortion \ Radiator
Plugin MuRa's Meister /
Copies
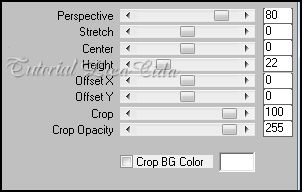
Plugin MuRa's Meister/ Perspective
Tiling
Plugin Nik Software/ Color EfexPro
3.0
Roteiro
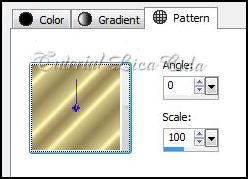
1-Abrir uma nova imagem transparente de
1024 x 600. Pintar com a Pattern gold (22).
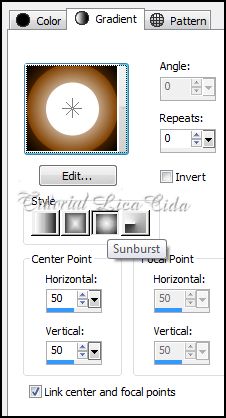
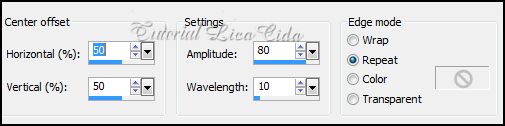
2-Nova layer\ Pintar com o gradiente
cg-eye-2. Configurar Sunburst :Repeats: 0. Invert
desmarcado.
H=50\ V=50
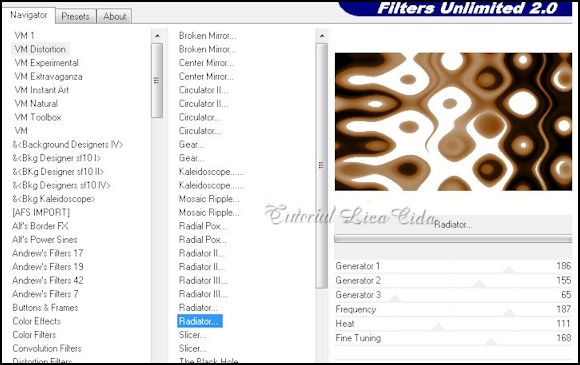
3- Plugin VM Distortion \ Radiator : 186\ 155\
65\ 187\ 111\ 168.
4-Selecione com a Ferramenta Magic Wand
_ default _partes escuras como mostra o print .
Delete.

_Selections / Select
none.
Ficará assim:
_Layers \Merge \
Merge Visible.
5-Effects\
Distortion Effects\ Ripple.
 _Layer \
Duplicate.
6-
Selections\ Select all. Selections\ Modify \ Contract 13.
Delete.
_Tirar a
visibilidade da layer merged.
_ Selection none.
7- Effects \
Geometric Effects\ Perspective Horizontal.
30 Transparent.
8- Effects\
Distortion Effects / Pinch. 100.
9-Effects\
Distortion Effects\ Warp .
_Layer \
Duplicate.
6-
Selections\ Select all. Selections\ Modify \ Contract 13.
Delete.
_Tirar a
visibilidade da layer merged.
_ Selection none.
7- Effects \
Geometric Effects\ Perspective Horizontal.
30 Transparent.
8- Effects\
Distortion Effects / Pinch. 100.
9-Effects\
Distortion Effects\ Warp .
 10-Repetir:
Effects\ Distortion Effects / Pinch. 100.
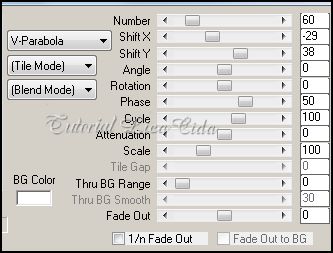
11- Plugin MuRa's
Meister / Copies/ Free Fall.
10-Repetir:
Effects\ Distortion Effects / Pinch. 100.
11- Plugin MuRa's
Meister / Copies/ Free Fall.
 _Layer Duplicate \
Image Mirror . Layer Merge Dow.
12-Aplicar uma
Mask Gradiente . Layer / Merge / Merge Group.
_Image
Flip.
13- Repetir a Mask Gradiente .
Layer / Merge / Merge Group.
_Image Flip.
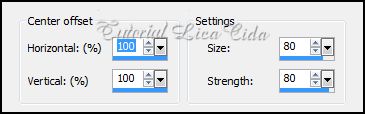
14-Image /Canvas Size _1024x700 _Bottom 100.
_Duplique essa layer \ Merge Dow.
15-Repetir: Effects\ Distortion
Effects / Pinch. 100.
_ Emboss 3.
16-Nova layer .
_Arrange/Send to Botton. Pintar com uma cor que combine .
_Usei a cor #897c47.
17- Aplicar a Mask 20-20. Layer / Merge / Merge Group.
_Blend Mode=Dissolve. Opacity 59%.
18_Ativar a layer
merged .
_Plugin MuRa's
Meister/ Perspective Tiling.
_Layer Duplicate \
Image Mirror . Layer Merge Dow.
12-Aplicar uma
Mask Gradiente . Layer / Merge / Merge Group.
_Image
Flip.
13- Repetir a Mask Gradiente .
Layer / Merge / Merge Group.
_Image Flip.
14-Image /Canvas Size _1024x700 _Bottom 100.
_Duplique essa layer \ Merge Dow.
15-Repetir: Effects\ Distortion
Effects / Pinch. 100.
_ Emboss 3.
16-Nova layer .
_Arrange/Send to Botton. Pintar com uma cor que combine .
_Usei a cor #897c47.
17- Aplicar a Mask 20-20. Layer / Merge / Merge Group.
_Blend Mode=Dissolve. Opacity 59%.
18_Ativar a layer
merged .
_Plugin MuRa's
Meister/ Perspective Tiling.
 _ Emboss 3 .
19-Aplicar a mask.ket -fadesuave. Layer / Merge / Merge
Group.
20-Image /Canvas Size _1024x750 _Bottom
50.
21--Nova layer .
_Arrange/Send to Botton. Pintar com uma cor que combine .
_Usei a cor #524c2a.
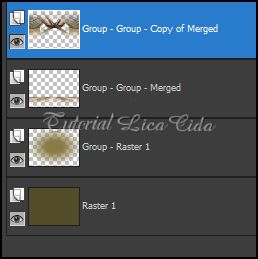
_LAYERS_
_ Emboss 3 .
19-Aplicar a mask.ket -fadesuave. Layer / Merge / Merge
Group.
20-Image /Canvas Size _1024x750 _Bottom
50.
21--Nova layer .
_Arrange/Send to Botton. Pintar com uma cor que combine .
_Usei a cor #524c2a.
_LAYERS_
 22- Ativar a
Raster1.
22- Ativar a
Raster1.
_New Layer. Select all / Edit Copy no
backamanhã lc1/ Edit Paste Into Selection . Selections
/ Select none.
_Blend Mode=Difference .
Opacity=55%.
23- Ativar a
Group- Raster1.
_ New
Layer.
_Buscar o Script. Clicar em Run Selected
Script. _Correr o
Script nuvens mara10.
 _Opacity=81%.
24- Ativar a layer _ Group-Group- Merged
.
_Aplicar novamente a mask.ket -fadesuave.
Layer / Merge / Merge Group.
_Image\Flip. Acomodar na parte inferior do
top.
_ Repetir o Emboss 3.
25-Edit Copy no tube
3029-luzcristina\Paste As New Layer .
Duplique e use a gosto.
26- Ativar a layer superior.
_Plugin Nik
Software/ Color EfexPro 3.0 /Bi-Color Filtters.
Moss1.
_Opacity=81%.
24- Ativar a layer _ Group-Group- Merged
.
_Aplicar novamente a mask.ket -fadesuave.
Layer / Merge / Merge Group.
_Image\Flip. Acomodar na parte inferior do
top.
_ Repetir o Emboss 3.
25-Edit Copy no tube
3029-luzcristina\Paste As New Layer .
Duplique e use a gosto.
26- Ativar a layer superior.
_Plugin Nik
Software/ Color EfexPro 3.0 /Bi-Color Filtters.
Moss1.
 _OBS: Suspender o efeito e usar a
gosto.
27-Edit Copy no tube
pspcybertubes2012-190\Paste As New Layer . Resize e posicionamento
.
_Faça o acabamento do seu Top .
_Aplicar a Marca
D'agua.
_Assine e
salve.
Aparecida /
Licacida, março de 2013.
_OBS: Suspender o efeito e usar a
gosto.
27-Edit Copy no tube
pspcybertubes2012-190\Paste As New Layer . Resize e posicionamento
.
_Faça o acabamento do seu Top .
_Aplicar a Marca
D'agua.
_Assine e
salve.
Aparecida /
Licacida, março de 2013.
Rio de
Janeiro_Brasil
 Outro modelo usando tube
_2051-luzcristina.
Efeito principal sem o Plugin Nik Software/
Color EfexPro 3.0 /Bi-Color Filtters.
Moss1.
Outro modelo usando tube
_2051-luzcristina.
Efeito principal sem o Plugin Nik Software/
Color EfexPro 3.0 /Bi-Color Filtters.
Moss1.

4-Selecione com a Ferramenta Magic Wand _ default _partes escuras como mostra o print . Delete.
_Selections / Select none.
Ficará assim:
_Layers \Merge \
Merge Visible.
5-Effects\
Distortion Effects\ Ripple.
_Layer \
Duplicate.
6-
Selections\ Select all. Selections\ Modify \ Contract 13.
Delete.
_Tirar a
visibilidade da layer merged.
_ Selection none.
7- Effects \
Geometric Effects\ Perspective Horizontal.
30 Transparent.
8- Effects\
Distortion Effects / Pinch. 100.
9-Effects\
Distortion Effects\ Warp .
10-Repetir:
Effects\ Distortion Effects / Pinch. 100.
11- Plugin MuRa's
Meister / Copies/ Free Fall.
_Layer Duplicate \
Image Mirror . Layer Merge Dow.
12-Aplicar uma
Mask Gradiente . Layer / Merge / Merge Group.
_Image
Flip.
13- Repetir a Mask Gradiente .
Layer / Merge / Merge Group.
_Image Flip.
14-Image /Canvas Size _1024x700 _Bottom 100.
_Duplique essa layer \ Merge Dow.
15-Repetir: Effects\ Distortion
Effects / Pinch. 100.
_ Emboss 3.
16-Nova layer .
_Arrange/Send to Botton. Pintar com uma cor que combine .
_Usei a cor #897c47.
17- Aplicar a Mask 20-20. Layer / Merge / Merge Group.
_Blend Mode=Dissolve. Opacity 59%.
18_Ativar a layer
merged .
_Plugin MuRa's
Meister/ Perspective Tiling.
_ Emboss 3 .
19-Aplicar a mask.ket -fadesuave. Layer / Merge / Merge
Group.
20-Image /Canvas Size _1024x750 _Bottom
50.
21--Nova layer .
_Arrange/Send to Botton. Pintar com uma cor que combine .
_Usei a cor #524c2a.
_LAYERS_
13- Repetir a Mask Gradiente .
Layer / Merge / Merge Group.
_Image Flip.
14-Image /Canvas Size _1024x700 _Bottom 100.
_Duplique essa layer \ Merge Dow.
15-Repetir: Effects\ Distortion
Effects / Pinch. 100.
_ Emboss 3.
16-Nova layer .
_Arrange/Send to Botton. Pintar com uma cor que combine .
_Usei a cor #897c47.
17- Aplicar a Mask 20-20. Layer / Merge / Merge Group.
_Blend Mode=Dissolve. Opacity 59%.
18_Ativar a layer
merged .
_Plugin MuRa's
Meister/ Perspective Tiling.
_ Emboss 3 .
19-Aplicar a mask.ket -fadesuave. Layer / Merge / Merge
Group.
20-Image /Canvas Size _1024x750 _Bottom
50.
21--Nova layer .
_Arrange/Send to Botton. Pintar com uma cor que combine .
_Usei a cor #524c2a.
22- Ativar a
Raster1.
_New Layer. Select all / Edit Copy no backamanhã lc1/ Edit Paste Into Selection . Selections / Select none.
_Blend Mode=Difference .
Opacity=55%.
23- Ativar a
Group- Raster1.
_ New
Layer.
_Buscar o Script. Clicar em Run Selected
Script.
_Correr o
Script nuvens mara10. _Opacity=81%.
24- Ativar a layer _ Group-Group- Merged
.
_Aplicar novamente a mask.ket -fadesuave.
Layer / Merge / Merge Group.
_Image\Flip. Acomodar na parte inferior do
top.
_ Repetir o Emboss 3.
25-Edit Copy no tube
3029-luzcristina\Paste As New Layer .
Duplique e use a gosto.
26- Ativar a layer superior.
_Plugin Nik
Software/ Color EfexPro 3.0 /Bi-Color Filtters.
Moss1.
_OBS: Suspender o efeito e usar a
gosto.
27-Edit Copy no tube
pspcybertubes2012-190\Paste As New Layer . Resize e posicionamento
.
_Faça o acabamento do seu Top .
_Aplicar a Marca
D'agua.
_Assine e
salve.
Aparecida /
Licacida, março de 2013.
Rio de Janeiro_Brasil
Outro modelo usando tube
_2051-luzcristina.
Efeito principal sem o Plugin Nik Software/
Color EfexPro 3.0 /Bi-Color Filtters.
Moss1.